I suppose since flooring and parquet files are built out of blocks, there is some sort of joke here. Not sure what it is though…
I was looking at my previous post on Athena, and wondering about how the cost of doing such analytics is driven very much by the cost of scanning all the data. Someone suggest to me to take a look at ORC files.
Now whilst the possibilities of getting it wrong and having the hordes of Mordor come erupting out of the screen were low, this is not an impossibility. The true limits of what cloudy stuff and terraform can do are as of yet untested… But I digress.
If you think about it, a CSV file is a bloody awful way to store data for processing. Sure it makes sense for humans because thats how we would write data down when we collect it, but it makes little sense for processing it. Most of what we want to process are in columns – if you think about it we tend to want to addd up lists of expenses, or find the smallest value in a list of numbers, or work out a deviation or range, or find all the people in the phonebook called Jones….
A CSV file is not the way to do this, if you think about it. Even in a really simple file like a list of expenses there is a lot of data that is not needed
EmployeeID
Name
PurchaseID
Amount
1
Smith
34324
182.20
2
Jones
35122
23.21
3
Patel
39123
1923.00
1
Smith
39441
84.67
1
Smith
39441
34.22
3
Patel
39124
518.34
4
Singh
43321
2885.23
To total the Purchase amounts up, you would have to read the entire CSV file as it is sequential access – this means that you read and discard perhaps four or five times as much as you need. A CSV cannot be read down as a list of columns, because the data is split by EOL – meaning the file has to be accessed row by row.
If we turned that on its head, if we stored the data in a file by columns, rather than rows we could do this. This sort of format is what ORC files, or another file format called Parquet does.
Parquet files are binary – they are not viewable directly. When you create them, the data is stored in columnar formats, and they are also (usually) compressed using one of several different algorithms which saves space and transfer costs. Getting data into a parquet format though is trivially easy if you have python installed.
Here I have taken one of the large CSV files from my previous post, and loaded it into a python session. It does have to fit in memory, pandas if you recall does need to hold everything in RAM, so there is a limit. However, reading it in, and then writing back out to a Parquet format file is simplicity itself.
The engine and compression are option but would be recommended to include. Snappy is as it says, quick and fast with modest compression. if you use gzip instead, expect about 30% more reduction in size for not a lot longer decompression time
For very large files that will not fit in memory, you can use the polars library (Why polars? Because it’s a bear bigger than a panda bear – library programmer humour I guess…). This has a disk based solution that will stream data off a disk and onto another, converting on the fly using little ram. It does work best if you have one ssd for reading and another for writing, and it will take much longer than a ram based conversion but if it wont fit in ram, theres little choice..
import polars as pl
pl.scan_csv(source=csv_file, schema=DataTypes.DTypes).sink_parquet(            path=parquet_file)
Looking at the file sizes that were created shows a marked difference…
The drastic reduction in size means that uploading to an S3 bucket is considerably faster than with a CSV file – and the cost of storage in the bucket is commensurately less as well. The file above was compressed using Snappy, a GZip would net even more savings.
What does Spark think?
Running the data in an Athena Spark notebook shows some interesting results. The code to do this is broadly similar with some differences around column names and syntax. The follow was used in place of the CSV based processing in the previous post.
from pyspark.sql.functions import col

df=spark.read.parquet("s3://131273-rawdata/parquet/")
dfRx = df.select('2').drop_duplicates()
uniqueRx = list( dfRx.select("2").toPandas()['2'] )
dfOutput = df.filter(col("2").isin(uniqueRx))
Data load time is more or less the same, even allowing for the required decompression because all the data still needs loading – each stage ran in 8 seconds, which to read in from an S3 bucket and decompress 13GB of data is quite impressive. The same operation on my laptop, running some fairly quick SSD’s was still nearly 45s
The second step was to select the unique list of rx stations, by means of a Drop_duplicates. This was quickest of all, under a second for both cases.
The third step is where the real savings were shown. For the CSV based solution doing the select below took 127 seconds.
Conversely, the parquet solution meant that the select only had to traverse the column of interest, and simply didn’t need to read the rest of the data. It ran tha following, in 19 seconds.
This is a clear winner, over seven times faster with the corresponding reduction in processing costs on the Spark data processing units. More importantly for the costs was the data scanned – in the first case there was an entire CSV file to read at. Spark charges are $5 per TB scanned, which is $0.005 per GB. Hence the 13.5GB CSV file was 6.5c to read. Compared to the Parquet approach which reported 830MB scanned, for a total of 0.4c Now 6 cents difference is hardly going to break the bank. But remember – thats for Every. Single. Query that you do. It all adds up.
Conclusion
Parquet files are a significant wealth enhancer – you can do a lot more with your budget or conversly, you can shrink your running costs significantly just by moving to them from CSV files. Something to seriously consider.
I’ve been loooking at mini PC’s. At home, I have a large, and quite power hungry server that I use for running all my virtual machines.
Whilst useful – it does take a considerable amount of power – about 250W all the time. With the cost of electricity these days it’s a not inconsiderable sum. 6kWh is what it uses a day, which is £1.50 a day, £10 or so a week, so £520 a year.
I needed to find something better, and this little Mini PC from MSI caught my eye. It also made me realise that this is the perfect device to recommend to people to set up their own home lab for dabbling with AWS and related Devops things…
Now if you have been following my ramblings, you will know that I am a great proponent of learning by doing – and there is no better way of learning this than getting your hands stuck in and well, doing stuff. The only trouble is that it can be a bit expensive…
Amazon do a fantastic job of the free web tier meaning that you can get your hands on some excellent things totally free of charge and actually use it for real production workloads. This is good – and if you dont have your free tier account set up you really should go and do it right now. The only problem is that it is a bit limited…
You see, what you really need to learn properly is something like GitLab – and that needs memory. AWS are quite understandably not going to hand out machines with 4 to 8GB of RAM for free, and that is what you need to really test Gitlab etc… so you have the problem that you can either suck up the cost – which isn’t much, or struggle with the free tier and have a lot fo frustrating out of memory issues to solve.
Theres also the problem of using up the free tier as well – if you fire up an EC2 instance, and it crashes, then you have just used an hours worth of run time. Remember that EC2 instances are charged by the hour and the free tier is 720 hours a month. If you crash your EC2 instance ten times and have to restart it – each time that’s ten hours of running gone, even if the instance was only up for a few minutes.
So you either pay for an EC2 instance – or pay for the electricty to run at home – as well as the capital cost for the server which could be considerable…
Enter the N100 from Intel.
This is the processor that uses a mere fraction of the power of anything else, and is still performant enough to get a lot of work done. My little cube computer sips about 11W of power – at full load! The running cost of that is nothing, it’s no more than a couple of energy saving lightbulbs. About 6p a day, about £30 or so a year I think it worked out at. The complete computer cost me no more than £300 with memory and storage, and I will get that back in less than a year just from the power savings from not running the old server…
To learn Devops – you cannot beat learning by doing. So, I suggest that you get a small computer, get proxmox installed on it, and then install the infrastructure that you need to do this. Get Gitlab installed, and get a Linux instance installed with the AWS CLI on it. Start poking at AWS with Terraform that your CICD pipe runs. This is how you learn..
I’ve shot a couple of videos showing the inside of the MSI Cubi, and how I configure the disks on it to support Proxmox. The rest is up to you to learn and puzzle about – but this is an excellent starting platform to learn how you can use and lever AWS to enhance your career. I will build upon this and show how you can extend your journey into AWS in future posts. I would have to say though – please excuse the quality of the video and the sound – I know they are not exactly ideal and any info or tips on improving them are warmly welcomed!
I have a data processing problem – I have too much of it. Far far too much… This is a post about exploring data, and how to process a lot of it, using Athena Notebooks which was a fun delve into a world I’d never really tried that much before.
However, to get there, there is a certain amount of setting the scene which is needed. I must ask you to come on a journey of discovery..
The Problem
A project I follow with a certain amount of geeky interest is the WSPRnet which lurks at https://www.wsprnet.org/drupal/wsprnet/map Essentially the idea is that a small number of very low power radio transmitters send a beacon which other small radio transmitters listen for. The results are collated on a web site and people can download the contact list.
The problem is that it has become, well, popular. Very popular. The filesizes in 2009 a year after it started were on the order of about 50MB a month. Come 2024, and we are knocking on the door of 15GB a month.
The other problem is that people are not using the system as it was designed, and it’s very difficult to fix the issue now. So the data we have is polluted… the old Big Data problem of Buggy Data… it needs cleaning up.
If we look at a typical dump of some of these CSV files we can see the structure
The first column is the spotID which is a unique entry into the database, the second is the UNIX timestamp. The third column is the callsign of the amateur radio station that is receiving and they are the ones that report the “spot” and upload it to the database. The seventh field is the callsign of the transmitting station.
All good. Apart from the slight issue that sometimes, people don’t actually put in the transmitting station and instead insert a message…
Here, we have a station that does nothing but receive – the SWL means that are a shortwave listening station. They have reported the transmitting station, AJ8S correctly though. Worse however, are stations that place incorrect details into the receiving callsign field such as a location
One solution is to clean the data by weeding out the incorrect transmit and receive callsigns. If we assume that any station that transmits also recevies, we can list all the receive station callsigns and then use that to pick only those stations that are also transmitting stations. In other words, we assume that all stations will be both transmitters and receivers and filter out the nonsensical stuff on either side.
This is easy to do with SQL – it’s bread and butter for a database. We simply load all the CSV files into a table, select a distinct list of recive stations and then use that to select those stations that are also transmitting…
LOAD DATA INFILE '/var/lib/load/wsprspots-2024-12.csv' INTO TABLE spots2

insert into prefix select distinct(rx) from spots2;

insert into spots select spots2.* from spots2 inner join prefix on spots2.tx=prefix.pfx;
We load the datafile into spots2, the SELECT DISTINCT makes sure we have a list of all the receiving stations, with only one in the list, and then we use that to select the final list into SPOTS using the standard inner join.
The only problem? It takes…. forever…..
It is fast, assuming you have enough memory. However, as the size of the monthly files increases, the speed falls dramatically. My database server at home has 128GB of ram, 32 CPU’s and a lot of fast disk – it is entirely memory bound. As soon as the work set gets too large for the memory it slows down considerably.
2009-01 started 03:54:06
2009-02 started 03:56:34
2009-03 started 03:59:11
2009-04 started 04:03:03
2009-05 started 04:07:42

.

.

2024-07 started  12:33:38
2024-08 started  13:54:58
2024-09 started  15:09:49
2024-10 started  16:37:41
2024-11 started  18:25:49
2024-12 started  20:14:00
It takes minutes for the first months from 2009 to run, and many hours for the latter ones. Clearly, a better way would be preferable.
Panda bears…
Modern data processing and analytics runs on Python, using a framework called Pandas. If you ever used the language R, this is easy enough to understand and isn’t much more difficult if you never have used R.
Here, we import the necessary libraries, Panda and Pyarrow and then create a dataframe called dfRaw to hold the raw data. This is loaded in from disk. If you are using Windows, don’t put backslashs into the path or it gets messy. Python will happily take “normal” *nix forward slashes in the path and not get confused. Loading the dataframe into memory takes a couple of seconds.
We can examine the size with the shape property and see it is about half a million records and 14 columns
>>> dfRaw.shape
(583455, 14)
Now, we pick a list of unique rx callsigns. Pandas has a convenient method to do this..
>>> dfUniqueRx = dfRaw[2].unique()
It really is that simple. We can look at the list of the callsigns by calling print…
So we now have the raw data loaded in and another dataframe holding a single column of data which is the unique callsign list. We can now use some of the powerful querying and filtering that Pandas has.
A single line, that needs a little unpicking. We are going to load the results into a new dataframe called dfCleaned. We do this by taking our raw data in dfRaw and specify that on column 6 – that is the seventh column (because we start counting from zero in Python) – we want to only pick values that are in the list of unique callsigns.
loc[6] selects the column to look at, and we apply the .isin filter and supply the list of callsigns from dfUniqueRx. It is that simple.
>>> dfCleaned.shape
(552314, 14)
>>>
We can see the end result has shrunk from 583455 to 552314 rows, so we discarded 31,141 rows.
The end results looks like what we would expect, and we can dump this dataframe out to a CSV file.
The entire process takes seconds, and is far faster than the disk based process of a SQL database. When running on my laptop, there was less than a second processing on each stage after hitting Enter…
So… whats the problem?
Memory.
All is good until you run out of memory. At this point, pandas will start throwing exceptions because you have to fit it into memory…. and if it’s bigger than system ram, it wont play ball. Note that the process above, which has a raw data frame and a cleaned one, means you are using memory inefficiently because you are holding the data twice over.
With the 2009 datasets, the half million rows are only a few MB in total. Looking at the later data from late 2024, we have raw datasizes of 16GB. On laptop with 32GB of ram, this won’t fit twice over and the system runs out of space.
The solution, is a distributed computing solution that specialises in rally big data… and fortunately there is one called Apache Spark. The problem, is that Spark needs a lot of work to set up, and to use and it needs a lot of understanding. Spark worklopads will scale across multiple compute nodes and it will distribute the compute requirements beyond what any one node can provide. Sounds ideal….
Spark of life
Amazon Web Services finally enters the discussion – so I hope you all stuck with me. AWS has a service called Athena, and AWS Glue which provide serverless analytics for processing big data. You simply load in your data via an S3 bucket, and then let Athena do the heavy lifting.
Athena has two main ways of processing data. One is via SQL queries, which are available in all regions where you can get Athena as far as I know. The Spark interface however is NOT available in all AWS regions – it is not available in London, eu-west-2 for example just yet, and you will need to use Dublin eu-west-1 to make use of this. Something to consider if data soverienty is a thing for you…
First things first – lets get the data into the bucket. I created a bucket called 131273-rawdata in the AWS console making sure this was in the eu-west-1 region.
Getting data in is easy – just use the aws cli, which is in my opinion a wonderfully underrated interface. It does have a few quirks about wildcards though.. Copying a single file is easy.
D:\python>aws s3 cp wsprspots-2009-01.csv s3://131273-rawdata/wspr
upload: .\wsprspots-2009-01.csv to s3://131273-rawdata/wspr
Multiple files, well the way you would expect has an issue.
D:\python>aws s3 cp wsprspots-2009-??.csv s3://131273-rawdata/wspr

The user-provided path wsprspots-2009-??.csv does not exist.
The correct way is to try to copy all the files with a period marker and then specify exclude and deny rules….
D:\python>aws s3 cp . s3://131273-rawdata/wspr/ --recursive --exclude "*" --include "wsprspots-2009-*.csv" --dryrun
(dryrun) upload: .\wsprspots-2009-01.csv to s3://131273-rawdata/wspr/wsprspots-2009-01.csv
(dryrun) upload: .\wsprspots-2009-02.csv to s3://131273-rawdata/wspr/wsprspots-2009-02.csv
.
.
.
(dryrun) upload: .\wsprspots-2009-11.csv to s3://131273-rawdata/wspr/wsprspots-2009-11.csv
(dryrun) upload: .\wsprspots-2009-12.csv to s3://131273-rawdata/wspr/wsprspots-2009-12.csv
This copies all files from the . folder ie the current folder and recurses through all files. It then excludes everything, so nothing is copied, and then you permit by way of the final include some files to copy. The –dryrun marker is essential to test. For more information on the s3 cp wildcards I would look here.. https://docs.aws.amazon.com/cli/latest/reference/s3/#use-of-exclude-and-include-filters
Once we have the data uploaded, open the AWS console and navigate to Athena
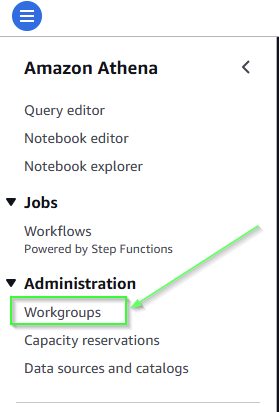
We need to start up an Apache Spark session, which needs a bit of setup work. Click on the hamburger in top left and click on workgroups
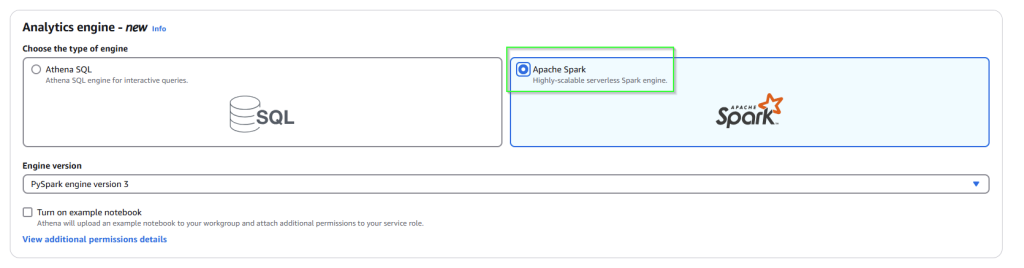
Now on the right, click on the yellow Create Workbook and then be sure to select the Apache Spark engine
You should then have an Apache Spark enabled workbook.
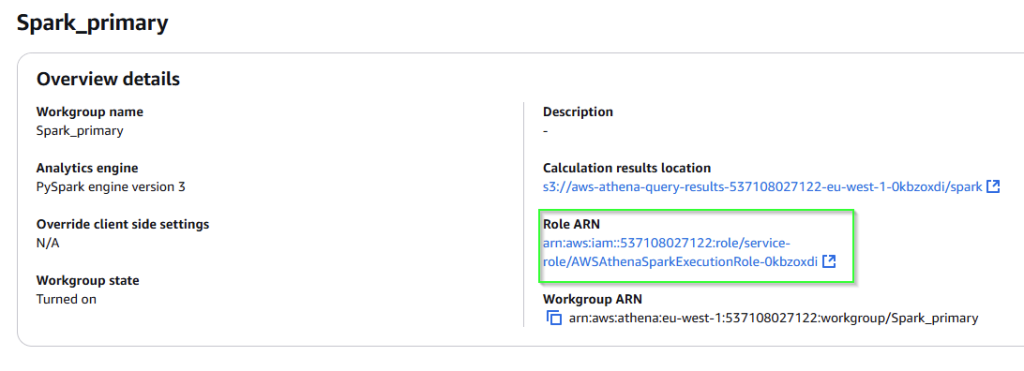
Athena can read files in from a standard S3 bucket, but to put data back into a bucket needs a little more work as it doesnt have the needed permissions. To resolve this open up the workbook page and find the relevant Role ARN
Click on the link and you will end up in the IAM centre
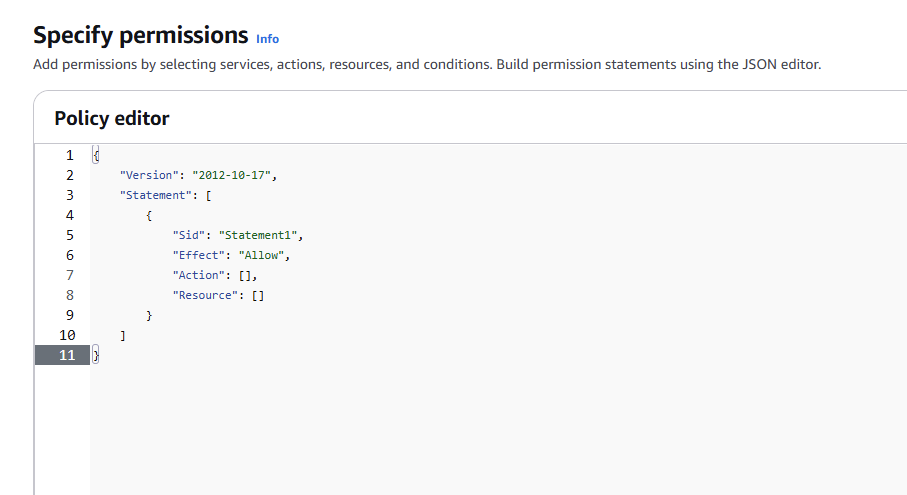
To add the extra permissions in we need to click on the add permission button in Permissions policies.
Specify an Inline policy and then click the JSON tab
This will show the permissions.
Delete all of the JSON in the Policy Editor, and replace with the following
This will give a set of reasonably robust permissions that will let Athena write out to any of the S3 buckets you posses – if you want to limit buckets you need to specify specific ones in the Resource section.
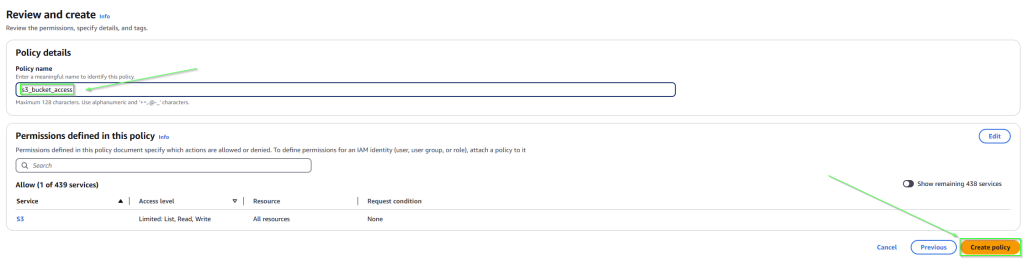
Click on Next and then on the next screen add a name for the policy and then Create Policy
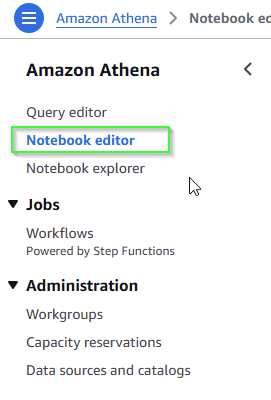
In Athena, navigate on the left to the notebook editor
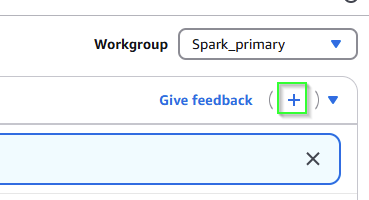
and then on the right, create a new notebook by clicking the plus icon
Once a notebook is created it will have access to up to 20DPUs – these are data processing units that Spark will extend out over if needed to improve the performace. Doing so can be expensive – DPU’s cost per hour and are about $0.55 an hour as well as data scanning of $5 per terabye read. It is possible to limit scale out of DPU’s although a minimum of three must be available.
In the notebook you can add lines which are known as cells. Each cell is sticky – the results stay in there for reuse by subsequent commands.
Here is an example of a notebook in development, the commands are run indivudually to evaluate the output.
Spark uses a similar structure and way of processing as Pandas, although it is definitly not the same as it has to account for scale out across nodes.
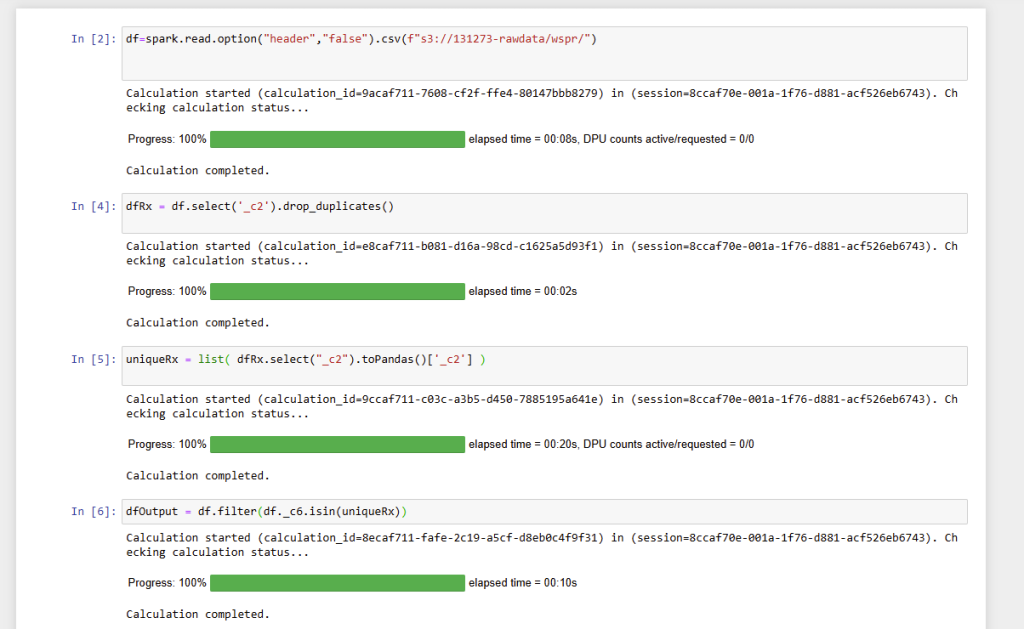
Line 1 reads in from the S3 bucket. Conveniently if all the files are placed in the same folder, it will read all the CSV files sequentially and process them which is a useful hack
Line 2 selects the duplicates in a similar fashion to the Pandas example earlier
Line3 is a little bit of a hack. You cannot use a Spark dataframe inside another Spark dataframe in Spark, so we convert it to a Pandas frame. This can then be used in line 4 to select the final list.
Finally line 5 writes out the results to the S3 bucket – the coalesce(1) ensures that it writes one file rather than chunking into a series of smaller files.
Apart from the write out – the entire process takes less than 30 seconds to process an entire years data.
Conclusions
Spark for Athena is quick easy and simple to set up and use processing resource. It can easily process data in and out through S3 buckets.
Cost can be an issue – to process a TB of data is going to be $5 to scan it. The the query is run twice then it costs twice as much – this is in addition to the compute costs. It is essential to be sure the queries are going to work without problems.
Local development is therefore essential, which means that you have to have a small Apache Spark setup to develop. This is possible using Python libraries but it is an additional layer of complexity. Small jobs can be prototyped inside of Athena if a small sample dataset is available as data scanning seems to contribute to most of the cost of Athena.
The benefits are large though – you can make use of a hardware setup that would cost upwards of tens of thousands of dollars and make use of it for quite modest outlays. For irregular jobs, it can be quite cost efficient to consume Athena resources for the processing ability that it gives.
People ask me how to start off in IT as a devops engineer. If you’ve asked me and been referred here – congrats. You are one of the people that made me sit down and actually write out the reasons why, rather than just mumble some half thought out response.Before we go any further though, this post is going to be pretty Amazon Web Services heavy. There are other cloud providers out there of course, but AWS to me is the one that offers the greatest breadth of services, and use for most every situation. So please don’t thjink I’ve never used Azure, or GCP – I have, but for someone starting out, AWS is the clear winner.
So you want to become a DevOps engineer? How long you think that is going to take?
Well, it’s decades. At least. Sorry to break that to you. Lets look at why that is the case though..
DevOps is the combination of cultural philosophies, practices, and tools that increases an organization’s ability to deliver applications and services at high velocity: evolving and improving products at a faster pace than organizations using traditional software development and infrastructure management processes. This speed enables organizations to better serve their customers and compete more effectively in the market.
DevOps uses an amazing variety of tools and skillsets to deliver what it promises, and that takes a lot of skill and commitment. Devops engineers come from a development or a sysadmim background typically – and they are generally highly competent in those. To get there takes time, and until I started looking at the enormity of what I needed to know, I didn’t appreciate fully what was needed, and how long it would take me to learn it again from scratch – so I wrote a roadmap of what I needed – as a minimum to know.
You can see the map here, attached as the graphic. Everything on here is a needed item – you don’t have to be an expert to understand them, and to be honest no devops engineer is going to have truly deep knowledge of all of them. But you do have to have a good appreciation of them, and know what the tooling and technology does, and where to get answers when you need to go looking. As a devops engineer you are expected to know this, to be able to fix this, and generally the expectation is that you can, and will do so.
Each section has my recommendations for what you want to learn, and some useful resources for doing so.
Lets start with the first.
Coding
This is the prime requisite. If you cannot code, you cannot develop things, and that is a pretty poor situation for someone whose title starts with “dev”. You need to have a good coding base, and these days it is easy to make a recommendation. It used to be a toss up between Python and Java, but now, with the seemingly unstoppable rise of Python in big data, this is the easy option to make.
Learn Python, learn it every day, use it every day to solve problems and develop code snippets. Once you have Python covered, it will be far easier to pick up more formal languages, like Rust and Go as well as Java.
Operating Systems
No matter what code you write and develop, at some point you are going to have to run it on an operating system somewhere… You can go serverless, and that is a possibility, but even the best serverless systems tend to have a few places where a long term task needs to run, and that implies an operating system somewhere. Most people will be best served learning Linux to start with, which then begs the question as to which distribution. I would in my experience say that about 90% of all commercial use cases run on either RedHat or Debian, with the remainder using SLES. It is probably wise to learna little more than what a standard user does about Windows and Windows server, but unless you know you are going to need it in your current or targetted employment, I wouldn’t consider it just yet.
Linux – Debian and RHEL
Also, consider that to run an OS effectivly, you should know a considerable amount about the underlying workings of it. Netowrking, security and monitoring and troubleshooting – and being familiar with these is the bare minimum that would be needed
Cloud
You don’t need to know any cloud systems at all to actually be a DevOps engineer. There isn’t actually anything that says that you have to take all of your on premise systems and put them in the cloud. It’s just that, if you start doing things the DevOps way – then the sheer utility, and conveneince, and scalability of the cloud becomes quite clear and is a natural accompaniment to it. As I have said before, AWS would be the first and best choice – it’s by far the most popular cloud, and has a huge range of services and technologies and facilities that mean you will find something useful regardless of your use case – and also will find things that you never knew even existed, and which are immediately useful.
The other useful thing about AWS is that you can get to use it, for free, for an entire year. This makes it an excellent platform for learning on, free of charge. The link for this is below. There is also excellent documentation, which although sometimes, shall we say is a little voluminous is extremely comprehensive.
AWS has a number of common technologies, and the following are links to the documentation for the most commonly encountered ones. These are the core learnings that everyone using cloud will need, more or less immediately
Whilst learning and getting up to speed on Python, I would also strongly suggest that you learn at the same time, AWS. They are very different things, and I always found learning a couple of thigs stops me from getting stale – if I am bogged down in learning how Python does classes, then switching to something else, like AWS stops be from losing interest.
Version control systems are something that let you organise and keep track of your code, and let you track all the changes that have been made throughout the development of the code base. Whilst you cannot often see how this is of use with just one person, and in truth it’s not that much use when starting out – consider how you track changes with dozens of people working on one codebase. When you have over a billion lines of code, as some large systems will do, with maybe a couple of thousand people working on a few hundred interlinked applications – you need to track these changes.
The answer is simple and it is called Git.
Git was written 20 years ago, and essentially, nothing else is used. It is renowned as a fearsomely unfreindly program, and thats true to an extent, but there is good documentation and there are good courses to learn as well.
Just remember, EVERYONE makes at least one massive Git howler and does something inappropriate with a rebase at some point in their career. Grasp the nettle firmly and own it – you will have to deal with this beast so there is no real option!
Once you have finished learning Git, have a look at the branching stratgies that are used by GitLab.. https://www.udemy.com/course/aws-lambda-a-practical-guide
Automation
If you have to do something twice in computing – write a script for it. Or better still, use a proper automation package.
Ansible is a configuration managment tool that lests you manage and configure all your servers from one place – be that have a dozem or upwards of (my person record) about 12,000. It solves the problem of manageing Windows systems by sort of pretending that they don’t exist, until recently that is… and even now it is still a Linux only tool really. Cosnidering that it is owned and developed by RedHat Linux that is hardly surprising though.
Paired with Ansible is Hashicorps Terraform. Terraform will build and maintain your environment in AWS for you from code, faster, quicker, and more repeatable than anything you can manage setting up by hand. This is the core of how DevOps works – an automated means of deployment and maintenance using resuable code modules that can be repurposed automatically.
Learning these is as simple as getting hands on with your free AWS account and running code – you have signed up for AWS yes…? If no – go do it now….
For Ansible, I have found nothing better than the published documentation – this is how it should be… https://docs.ansible.com/
Alternative packages are Chef, and Puppet, which were once suseful but have lost ground recerntly to the domination of Ansible and Terraform. Whilst I wouldnt recommend learning them in depth, unless you need to, it would be wise to at least have an understanding of them
CI/CD
This is the process of autmatically pushing the code out to the production environment. A Continously integrated system measn that when every change is checked in in Git, the code is merged into the production code base. Along the way, the Devops engineer can mandate many useful tools that run automatically and check that the code is up to quality, that it is formatted correctly, that it is properly linted, that it has no secrets plublished in the open, that it passes unit tests and function tests etc….
The tooling that does this is a CI/CD pipeline, and here there are several to choose from. The most common are perhaps Gitlab, which as you can imagine is very tightly integrated with Git, and this would be my first choice to learn. It is like so many of the tooling choices open source, and can be run at home, which is the subject of another article.
Jenkins is an older package, and one that is still common to be used. Whilst I would suggest everyone learn Gitlab, there is a lot to be said for having a good familiarity with Jenkins as well. A less common system still worth knwoing about is CircleCI.
The CI/CD pipleline can call any of a vast range of tooling and frameworks which are really too much to consider listed here, however dealing with secrets for logging into systems and also with binary objects, images, datasets etc is something that everyone will need to know. This leads into Secrets management, of which the emerging leader is Hashicorps Vault, along with Nexus and Artifactory for storing objects which cannot easily be stored in Git.
Finally and not least is Docker and the concept of containerisaation. This allows a small fast lightweight container, which holds just enough operating system for the application that it runs to operate. Containers are a form of lightweight virtualisation, and there is no better place to learn about them from the books by Nigel Poulton. The first book runs you through everything that you will ever need to know about Docker, and the second book covers the orchestration platform Kubernetes which manages all the Docker containers that you create.
Don’t be disheartened by how much there is… becoming good at anything is always a marathon not a sprint, and for something as large as DevOps, it will take a long time. But by nibbling away at it – after all even the largest meal is eaten and enjoyed one bite at a time – you will get stuck into what is one of the most fascinating pastimes and careers that I know of.
I hadn’t realised that the web site was that broken, and that I’d been sending people links to comments that were not actually there.
I’ve done some majorly hacking about of the system and dragged some stuff out from backups and rebuilt the image libraries (which is why they all have march dates now.. lets hope that faffing on the back end will stay together. It should now work… fingers crossed.)
I suppose I should write something about how to back stuff up properly as well… sigh….
So in previous sections we talked about how SSH keys were far more preferable to passwords, and considerably more secure. But how do you get these onto your EC2 instances?
We saw that when you launch an instance, you can – in fact should – assign an AWS generated key to them. But what if you dont want to use that key – wouldnt it be nice to get a key already installed on the EC2 instance when it starts up? This is perfectly possible, along with other things, and we shall use this to demonstrate a very useful tool called Packer…
First we need to get access to the AWS command line. If you dont yet have the AWS CLI installed on your box, be that Windows Mac or Linux, then go and get that downloaded and installed now from here.. https://aws.amazon.com/cli/
I make no apologies for doing all this from a Windows machine btw – because that is what most people will probably start by using. I would urge everyone to start moving towards a linux world though, simply because it is the most flexible if a little more awkward to learn…
Once you have the CLI installed you need to get access to it programatically. This needs access keys, so fire up the AWS console, log in and go to IAM – Identity and Access Management.
In here, there is an option to add access keys to an IAM user. If you don’t have an IAM user set up and are still using root – then stop and get a user added first.
From the user section, add an access key for CLI access. This will give you an access key, and a secret key. Make very careful note of them – again in a password safe like https://keepass.info/ is an ideal place.
You can now configure the aws cli to use these keys to access your AWS account. Get to the command line, and enter aws configure
This will ask for the access and secret key, as well as your default region and output options. You can pick the defaults for the latter two – I would suggest <none> for output format unless you want JSON for some reason…
C:\Users\cs\git\packer>aws configure
AWS Access Key ID [****************KPMR]:
AWS Secret Access Key [****************P1ku]:
Default region name [eu-north-1]:
Default output format [None]:

C:\Users\cs\git\packer>
If you now type aws s3 ls from the command line it should just return a list of all the S3 buckets on the account – or a blank line if you don’t have any. If you havent set up the keys or entered them correctly it will give you an access error instead which will need troubleshooting.
Assuming all is well, then we have access to the account from the CLI.
What we are going to do now is create an new Amazon Machine Image. You have probably seen these before – they are the AMI’s that are used to create EC2 instances. As well as the several hundred, if not thousands that you are provided with you can also roll your own. We are going to build one with our keys built into it, so we can connect directly.
Packer is a tool from Hashicorp that will let you build images of, amongst other things Amazon Machine Images, AMI’s. You can get a download from here… https://developer.hashicorp.com/packer/install?product_intent=packer
Once you have it downloaded, you will have a single file – that’s all no dependencies. Stick it somewhere in your file structure – I prefer to have a folder c:\program files\hashicorp and all their tooling such as Packer and Terraform goes in there. I then just add it to the path, so I can run it from anywhere.
Lets do a dry run. In a new folder, create a file called packer.pkr.hcl and enter the following…
It’s quite a lot to take in, so lets look at what it is going to do…
The first part sets up the plugins and requirements by downloading the latest shim from gitlab to enable the packer tool to interface correctly to AWS.
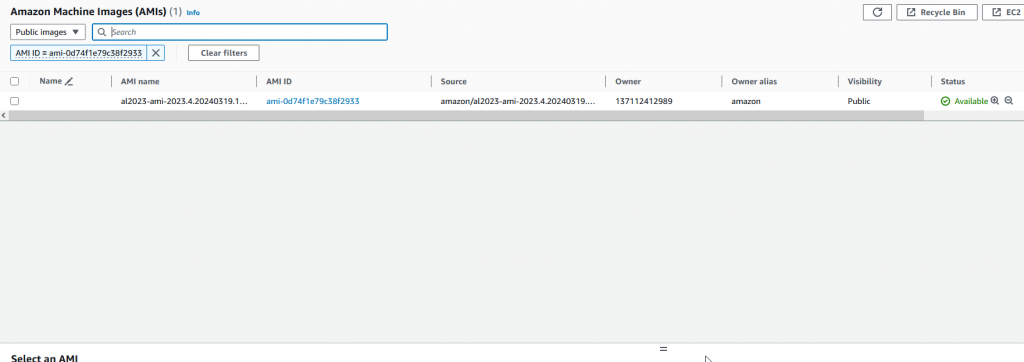
The second part – starting with source “amazon-ebs” “amazon-linux” defines the source image that you are going to use to build your image. Here, the packer tool will download and create an ami image called “packer-example-2” with the defined instance types, here it is a t3.micro etc. It does this from the source image that is defined in the source_ami_filter.
You have to pick an AMI image that is available in your region (remember the default region you picked when setting up the CLI?) An AMI image for Amazon-Linux2 in say, us-west-1 is NOT the same as one in eu-north-1 despite being exactly the same, they have a different AMI number. As newer versions are released and updated, the AMI number changes as well. You need to got to the EC2 instance page, and list the AMI’s available from the AMI section on the left toolbar. Find an Amazon-Linux2 image, and copy the entire AMI number (including the AMI- bit at the beginning)
You now need the owner ID, which you can find by listing all the available AMI’s – stick in the AMI id and it will filter down to give you just one line. You will also want the Owner ID – this is the AWS account that owns that image, in this case oddly enough it is Amazon.
If you are runing on en-north-1 (Stockholm) and it’s not too far into the future, the supplied values I gave in the file will work. Otherwise plug your details in and save the file.
Now we can run Packer against the file and it will do stuff….
Firstly, you must run packer init packer.pkr.hcl to download the relevant plugins that are needed. You only have to do this once per folder that you use.
C:\Users\cs\git\packer>packer init packer.pkr.hcl
Installed plugin github.com/hashicorp/amazon v1.3.1 in "C:/Users/cs/AppData/Roaming/packer.d/plugins/github.com/hashicorp/amazon/packer-plugin-amazon_v1.3.1_x5.0_windows_amd64.exe"
Once init is done, then you can run against the main file with packer build packer.pkr.hcl
C:\Users\cs\git\packer>packer build packer.pkr.hcl
SSH-keys-loaded.amazon-ebs.amazon-linux: output will be in this color.

==> SSH-keys-loaded.amazon-ebs.amazon-linux: Prevalidating any provided VPC information
==> SSH-keys-loaded.amazon-ebs.amazon-linux: Prevalidating AMI Name: packer-example
    SSH-keys-loaded.amazon-ebs.amazon-linux: Found Image ID: ami-0d74f1e79c38f2933
==> SSH-keys-loaded.amazon-ebs.amazon-linux: Creating temporary keypair: packer_6609bc15-904d-2bb3-1580-c0f46b08246d
==> SSH-keys-loaded.amazon-ebs.amazon-linux: Creating temporary security group for this instance: packer_6609bc16-6bef-fc19-83e6-eef8816d6119
==> SSH-keys-loaded.amazon-ebs.amazon-linux: Authorizing access to port 22 from [0.0.0.0/0] in the temporary security groups...
==> SSH-keys-loaded.amazon-ebs.amazon-linux: Launching a source AWS instance...
    SSH-keys-loaded.amazon-ebs.amazon-linux: Instance ID: i-0f1346d8d379362b8
==> SSH-keys-loaded.amazon-ebs.amazon-linux: Waiting for instance (i-0f1346d8d379362b8) to become ready...
==> SSH-keys-loaded.amazon-ebs.amazon-linux: Using SSH communicator to connect: 13.51.162.255
==> SSH-keys-loaded.amazon-ebs.amazon-linux: Waiting for SSH to become available...
==> SSH-keys-loaded.amazon-ebs.amazon-linux: Connected to SSH!
==> SSH-keys-loaded.amazon-ebs.amazon-linux: Stopping the source instance...
    SSH-keys-loaded.amazon-ebs.amazon-linux: Stopping instance
==> SSH-keys-loaded.amazon-ebs.amazon-linux: Waiting for the instance to stop...
==> SSH-keys-loaded.amazon-ebs.amazon-linux: Creating AMI packer-example from instance i-0f1346d8d379362b8
    SSH-keys-loaded.amazon-ebs.amazon-linux: AMI: ami-09cdb78d2a743a9a4
==> SSH-keys-loaded.amazon-ebs.amazon-linux: Waiting for AMI to become ready...
==> SSH-keys-loaded.amazon-ebs.amazon-linux: Skipping Enable AMI deprecation...
==> SSH-keys-loaded.amazon-ebs.amazon-linux: Terminating the source AWS instance...
==> SSH-keys-loaded.amazon-ebs.amazon-linux: Cleaning up any extra volumes...
==> SSH-keys-loaded.amazon-ebs.amazon-linux: No volumes to clean up, skipping
==> SSH-keys-loaded.amazon-ebs.amazon-linux: Deleting temporary security group...
==> SSH-keys-loaded.amazon-ebs.amazon-linux: Deleting temporary keypair...
Build 'SSH-keys-loaded.amazon-ebs.amazon-linux' finished after 2 minutes 57 seconds.

==> Wait completed after 2 minutes 57 seconds

==> Builds finished. The artifacts of successful builds are:
--> SSH-keys-loaded.amazon-ebs.amazon-linux: AMIs were created:
eu-north-1: ami-09cdb78d2a743a9a4
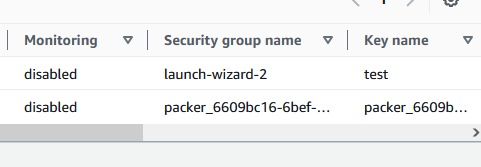
If you watch the EC2 instances window in the console, you will see that an instance starts on it’s own, and it is not started by the AWS “launch-wizard-2”. Instead it is launched by the Packer program with packer named security groups as you can see here. It is using your access keys on the AWS cli that you set up earlier to do this.
What Packer is doing, is launching an AMI that it controls, and making a copy of it. It takes that launched image, clones it, generates a new AMI and then uploads that to your AWS account. This is then your image and no one else can use it, unless you decide to publish it to the world. However it is possible for you to use it to launch EC2 instances. The very last thing that Packer does is show you the AMI ID… eu-north-1: ami-09cdb78d2a743a9a4
You can see if you go to the AWS console, into EC2 and then the AMI list, that Packer has cloned an AMI instance, and added it into here – your own list of AMI’s…. you can see here that it is owned by me, not by Amazon, or Canonical or anyone else.
On the face of it thats not that useful. If you were to start up an EC2 instance from this, then it would not do anything different from the Amazon Linux master AMI it was copied from. What we need to do is change it.
Take a look at the following build block. We have added a provisioner section to it – go ahead and paste that part into your working file now.
This instructs Packer to build onto the source that it already has… the source is the Amazon provided AMI and this builder changes that AMI and makes it more useful to us… It does so by means of a provisioner. You can see that the first line references the source so we make sure we are building on the correct thing. It then starts the provisioner – in this case a shell that runs inline with the AMI. In essence, it starts the Amazon linux image up, runs some shell commands, shuts down when they are completed and then packages up the AMI.
The commands are quite simple – it goes the the ec2-users home directory, echos a new authorized SSH key into the .ssh folder and appends it and then finishes. We – of course – can choose any SSH key we want there and clearly you can pick the one that would be used by your local client to connect to the EC2 instances.
To get the key for the shell provisioner, you need to go to the linux box that will connect to this EC2 instance….
All you are doing is listing the contents of the public key used for SSH connections. The three line block line starting with “ssh-ed” is in fact just one line. That is pasted into the packer file above, as can be seen.
So now we have the key in place, let us or rather let Packer build it…
C:\Users\cs\git\packer>packer build packer.pkr.hcl
SSH-keys-loaded.amazon-ebs.amazon-linux: output will be in this color.

==> SSH-keys-loaded.amazon-ebs.amazon-linux: Prevalidating any provided VPC information
==> SSH-keys-loaded.amazon-ebs.amazon-linux: Prevalidating AMI Name: packer-example
    SSH-keys-loaded.amazon-ebs.amazon-linux: Found Image ID: ami-0d74f1e79c38f2933
==> SSH-keys-loaded.amazon-ebs.amazon-linux: Creating temporary keypair: packer_6609bf5b-e4a3-ce11-c840-1824b58cc7bd
==> SSH-keys-loaded.amazon-ebs.amazon-linux: Creating temporary security group for this instance: packer_6609bf5c-7dfe-655b-a95e-1e3d3c063d2b
==> SSH-keys-loaded.amazon-ebs.amazon-linux: Authorizing access to port 22 from [0.0.0.0/0] in the temporary security groups...
==> SSH-keys-loaded.amazon-ebs.amazon-linux: Launching a source AWS instance...
    SSH-keys-loaded.amazon-ebs.amazon-linux: Instance ID: i-022160480d5269485
==> SSH-keys-loaded.amazon-ebs.amazon-linux: Waiting for instance (i-022160480d5269485) to become ready...
==> SSH-keys-loaded.amazon-ebs.amazon-linux: Using SSH communicator to connect: 13.51.163.233
==> SSH-keys-loaded.amazon-ebs.amazon-linux: Waiting for SSH to become available...
==> SSH-keys-loaded.amazon-ebs.amazon-linux: Connected to SSH!
==> SSH-keys-loaded.amazon-ebs.amazon-linux: Provisioning with shell script: C:\Users\cs\AppData\Local\Temp\packer-shell1025933176
==> SSH-keys-loaded.amazon-ebs.amazon-linux: Stopping the source instance...
    SSH-keys-loaded.amazon-ebs.amazon-linux: Stopping instance
==> SSH-keys-loaded.amazon-ebs.amazon-linux: Waiting for the instance to stop...
==> SSH-keys-loaded.amazon-ebs.amazon-linux: Creating AMI packer-example from instance i-022160480d5269485
    SSH-keys-loaded.amazon-ebs.amazon-linux: AMI: ami-0eb503b7ffff18ef2
==> SSH-keys-loaded.amazon-ebs.amazon-linux: Waiting for AMI to become ready...
==> SSH-keys-loaded.amazon-ebs.amazon-linux: Skipping Enable AMI deprecation...
==> SSH-keys-loaded.amazon-ebs.amazon-linux: Terminating the source AWS instance...
==> SSH-keys-loaded.amazon-ebs.amazon-linux: Cleaning up any extra volumes...
==> SSH-keys-loaded.amazon-ebs.amazon-linux: No volumes to clean up, skipping
==> SSH-keys-loaded.amazon-ebs.amazon-linux: Deleting temporary security group...
==> SSH-keys-loaded.amazon-ebs.amazon-linux: Deleting temporary keypair...
Build 'SSH-keys-loaded.amazon-ebs.amazon-linux' finished after 2 minutes 58 seconds.

==> Wait completed after 2 minutes 58 seconds

==> Builds finished. The artifacts of successful builds are:
--> SSH-keys-loaded.amazon-ebs.amazon-linux: AMIs were created:
eu-north-1: ami-0eb503b7ffff18ef2
On a first glance this looks no different from the previous packer run, however, there is an extra line about halfway down… ==> SSH-keys-loaded.amazon-ebs.amazon-linux: Provisioning with shell script: C:\Users\cs\AppData\Local\Temp\packer-shell1025933176 It is clear that the shell provisioner has run, and done it’s magic.
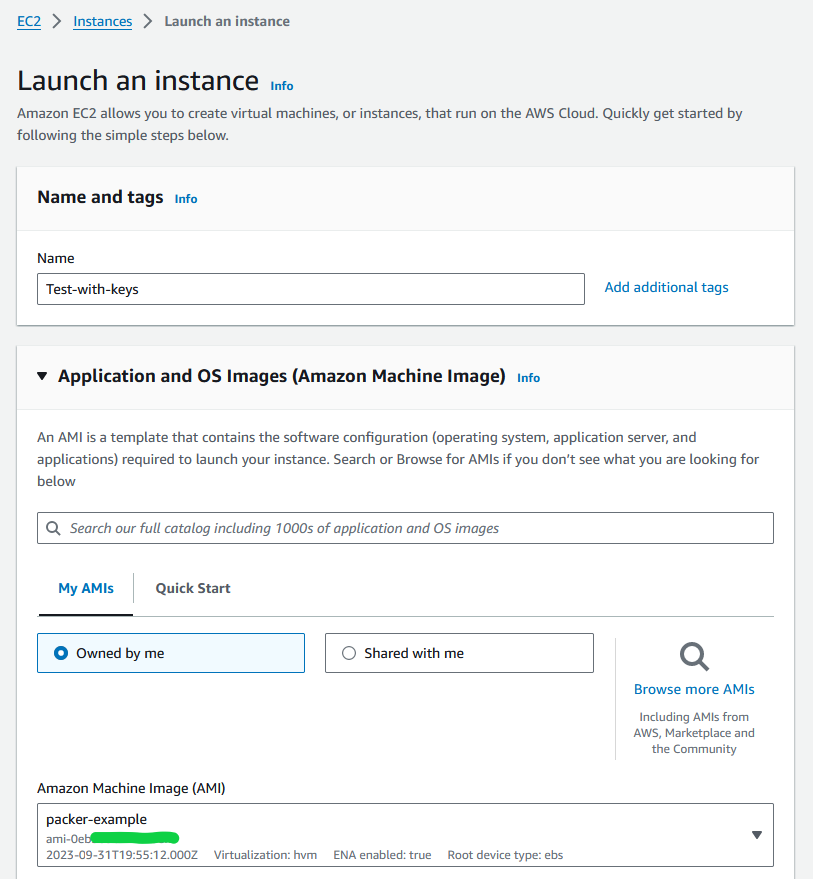
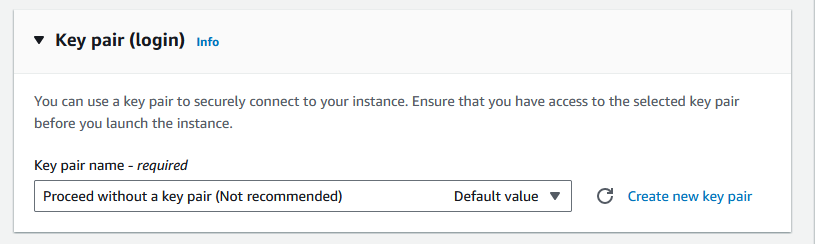
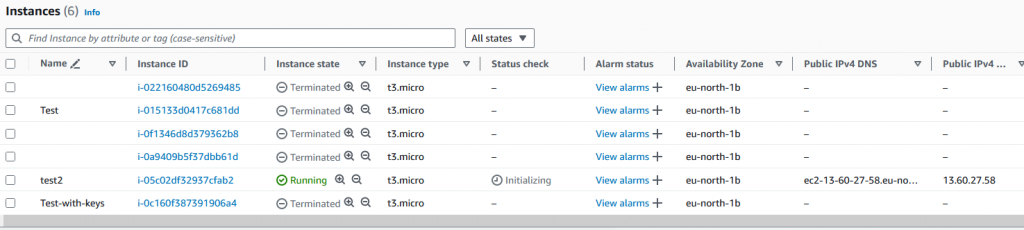
If we now start up a new EC2 instance from our AMI, and – quite deliberatly – we do not give it any SSH keys, we would expect to find it quite difficult to log in – assuming all was normal… So let’s fire up a new EC2 instance from our newly created AMI – you can find it by selecting the “My AMIs” and “Owned by me” options
We will be sure to supply no key at all..
Now the image is running, we can find it’s IP address from the EC2 instances dashboard in the usual fashion. All the old instances you see here and what are left over from my creating AMI images with Packer and test building them…
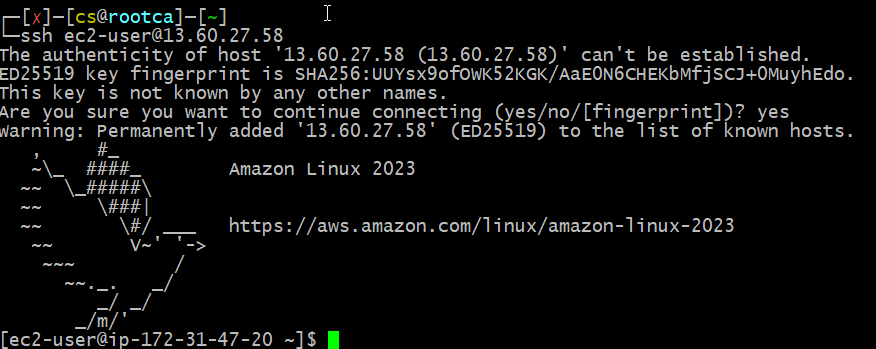
The IP address is 13.60.27.58… so we go to the linux box that has the public/private key pair that we installed using packer and log on…
As you can see, the system logs in after checking the host key. No password needed, no AWS supplied key needs to be installed.
Cleanup
When you have finished, be sure to shut down the machines that are created otherwise they will eat into the free tier, and perhaps you will be charged for them.
Also – it does cost money to keep an AMI image lurking around in your private store. The actual AMI itself is free, but it is based on an EBS snapshot and that is covered to a point by the free tier – however I would still deRegister (not deactivate) the AMI to be sure there are not unexpected charges later on.
Recap
We took an existing Amazon-linx AMI and instructed Packer to do the following.
Spin up a copy on our account, using our CLI credentials
Modify that copy, by means of a builder which made use of a shell provider to add in the public key from our local linux box
Packer made the modification, and then copied the changed machine making a new Amazon Machine Image which it placed in our private store and then gave us the new AMI ID
We then started an EC2 image from that new AMI and were able to log in directly without using AWS supplied keys
On the face of it this is not that useful – we could just as well keep a key in AWS and use that instead. The principle however of creating significantly modified images with for example custom software loads, configurations, etc is clear to see. There is no need to build a webserver onto every EC2 instance that you stand up, if you can use Packer to install and configure, and then load the website onto a custom image for you.
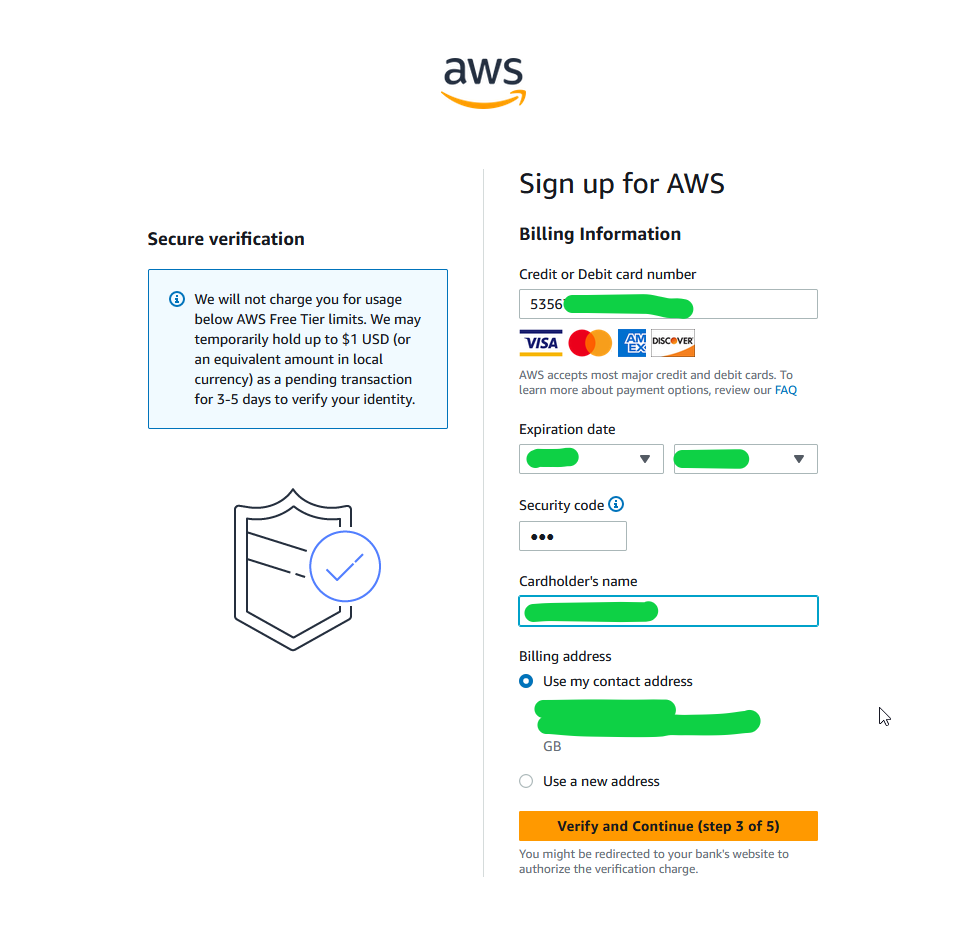
I’ve said before about getting a free AWS account – well if you want to know how to do it, then read on…
You need – a credit or debit card, and an email address. That’s it really…
Go to https://aws.amazon.com and in the top right, click the orange “Create an AWS Account” button, or you can read more about the free tier here.. https://aws.amazon.com/free/
You will then get asked to put in your email address – you can use any as far as I know, work, home, Gmail, doesn’t really matter.
It then asks for a verification code, check your email and put it in.
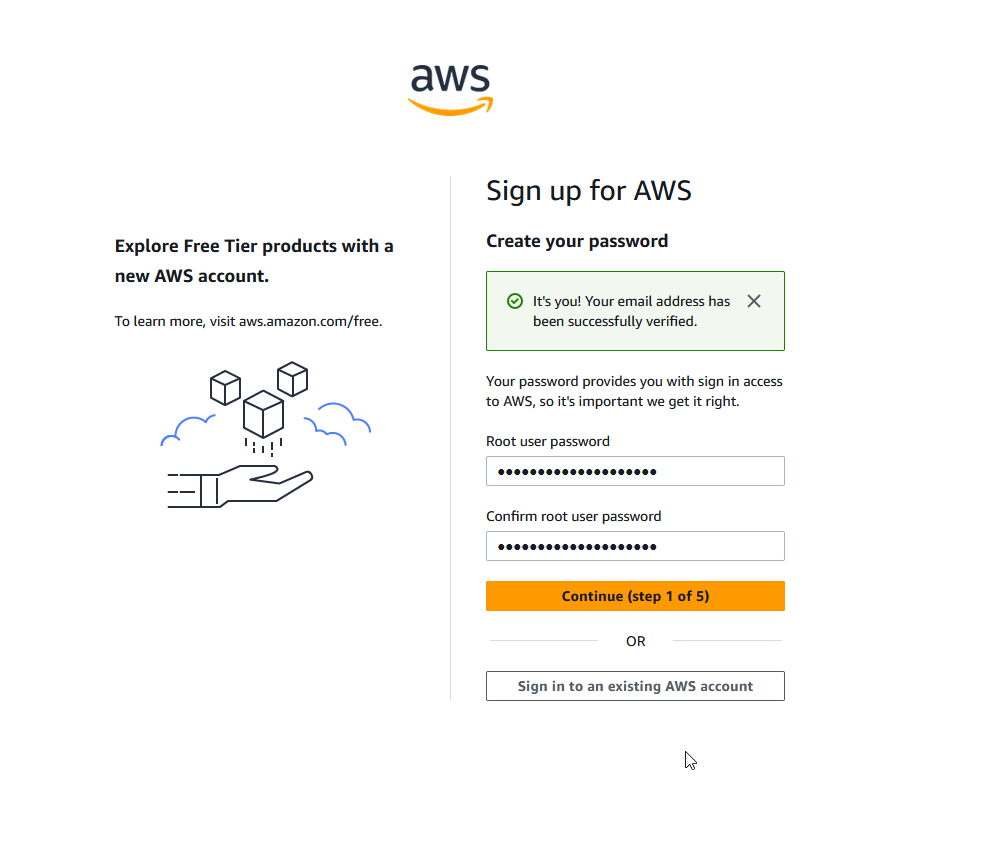
Next step – choose a good STRONG password- preferably a lot of random characters at least 20 characters long. Use a password safe, I recommend Keepass https://keepass.info/
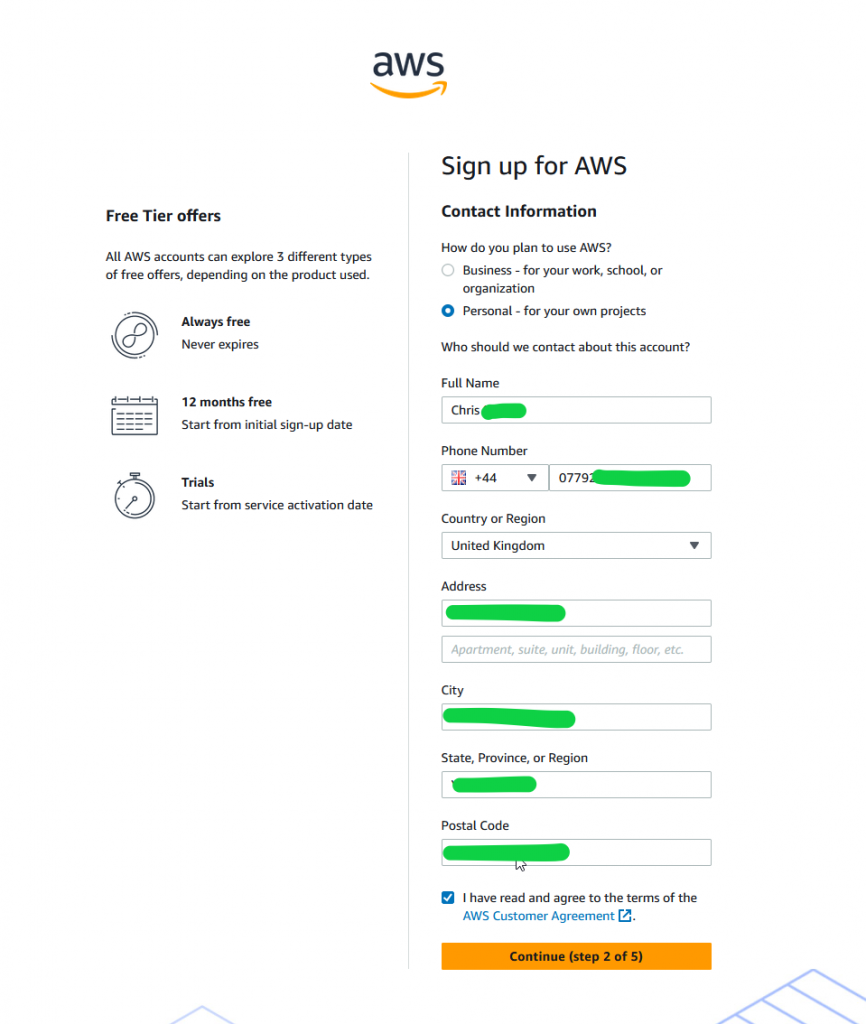
It then wants some contact info – so fill out the details. If you are using a credit/debit card then it helps if the address is the same as the card address. Don’t worry, it won’t charge you unless you go over the free tier limit.
Now it’s time for your credit card. Be aware that it may not bill you – if you spend anything – in your local currency so pick a card with good conversion charges if thats goign to be an issue.
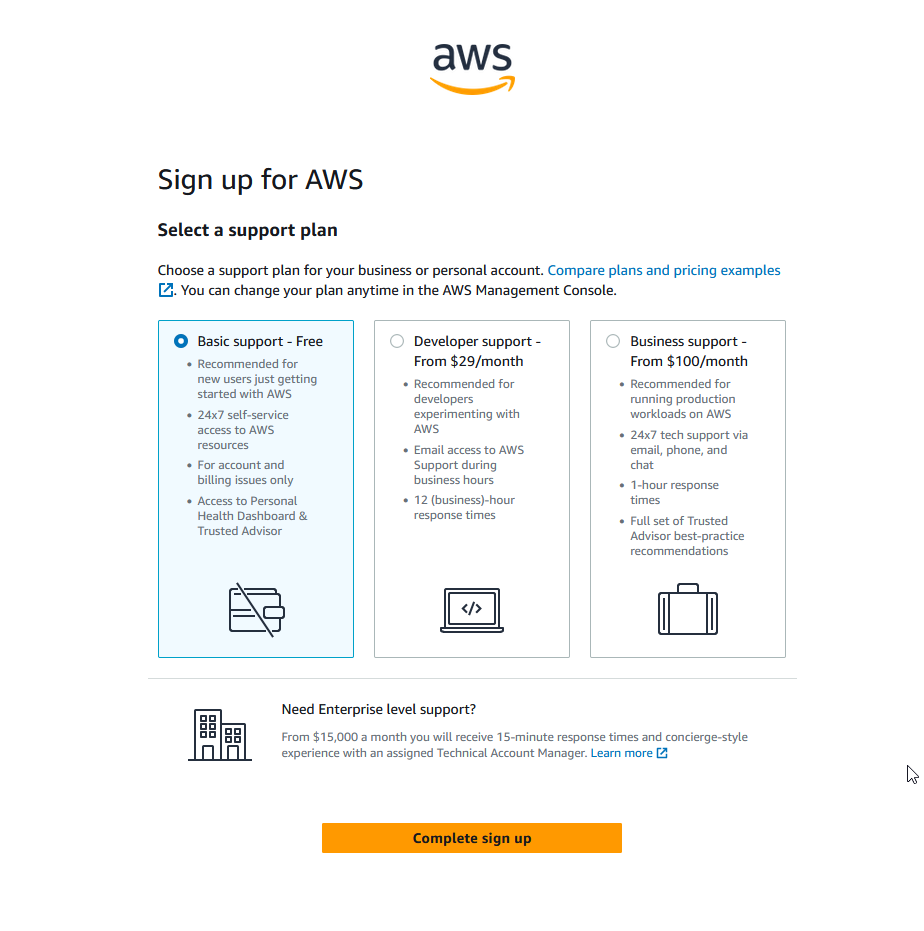
It also will ask your support preferences.. if you want to give them money pick one of the paid options but really there is no need – the documentation is going to be good enough and there is always the community to ask for help as well! You can always change the tier later if you do need instant support if that becomes a thing.
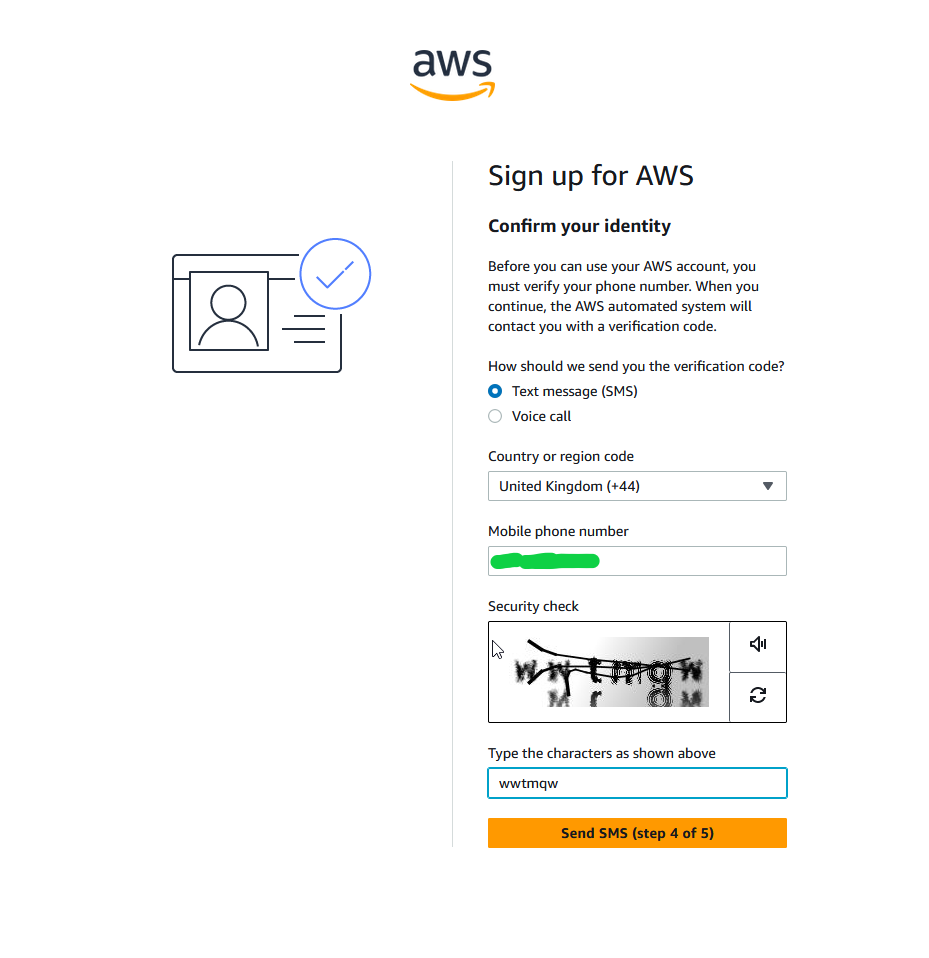
It also will want to be sure your phone number is working fine as well as your email – so if you didn’t put a real one in earlier, shame on you and stick the real one in now! You an either have SMS or some computer voice talk to you for verification.
And thats it – you now have a free tier account for the next year which you can use to follow along here and in many other useful places!
I was faced with an interesting one a couple of days back that needed a little time to find a solution. We’ve all probably been there, developers leaving cruft behind, hopefully in QA that is no longer needed.
We’d had a check show up some security groups that were basically wide open and permitting access to 0.0.0.0/0 -not the ideal solution. We needed to remove, or close them down, and the trick was to see if they were actually used.
Naturally none of them were convenient and defined in the Terraform back end, these had been added through the console.
It should be clear that if a SG isn’t actually attached to a network interface then it’s probably not doing very much and can be removed. With the CLI you can easily query network interfaces to see what groups are associated with them…
aws ec2 --profile qa describe-network-interfaces
Becasue I have a number of accounts to look at, my credentials file has a whole series of different sections for each of the accounts.. I can therefore pick which one commands will run against with a –profile switch…
You will note that there is not a default section – so if I miss a profile out then it will error. This stops me inadvertently running the command against the default account, which might be the wrong one and could cause serious issues…
The output from the describe-networks shows the network connection in full. It’s fairly easy therefore to see if there is an attached security group…
With a little poking its then easy to take an existing SG id and use that to query the network interfaces list to see if your SG is attached to any network interface.
Lets look at the command. The first part lists all the network interfaces in the account described in the profile. The second part filters the output.
AWS cli has two ways of searching for things – the server side –filters and the client side –query. Confusingly, client side querying isn’t really querying as such – it’s more selecting a set of fields to return. It is usually easier to filter server side where you can search for specific values.
Looking at the raw JSON output from the first command, you can see the values we are interested in here..
Aggravatingly, the –filters option does not use these – if you were to filter the key “GroupId” it will fail. The filter values are instead found in the AWS cli reference documentation found here…
Now we can see that we can filter on the group-id (which is case sensitive – don’t call it Group-Id) and we also specify a Values field, which can contain more than one value to filter on. Here though we only look for one value.
The query returns an empty value – this security group is not bound to any network interface and can probably be removed as being unused.
This works fine of course, assuming that you know the ID for the group in question. If however you have no idea of which groups to even start looking at, then it becomes a much more problematic situation as even a small account usually has a large number of security groups to deal with.
We can use a related aws cli command called describe-security-groups to obtain all of the security group ID’s in an account. Let us have a look at this…
aws --profile=qa ec2 describe-security-groups
This lists all of the groups information – which isn’t quite what we want. By using a client side query, we can now narrow the field down. We are going to select all of the contents of the top level key SecurityGroups by setting that as a wildcard, and then tell it to extract what is in each GroupId subkey.
This is the information that we need, but we cannot easily use this or parse it for another command. However, if we choose text output instead of JSON….
Now we have a nice clean list of ID’s with nothing else on them. This is perfect for parsing with a tool called xargs. This will work on linux and Mac, but you will need something like cygwin or gnu bash for this to work on Windows.
If you pass the previous command into a pipe and send it the AWS command tools, the entire block of ID’s will arrive as one big blob. This is not what we want. xargs will split up the incoming blob, usually when it finds a whitespace character and then use just the split parts to call whatever command you want. Let’s have a look at how we are going to do this…
The first part before the pipe is just the code we saw that gives us a clean list of ID’s. That output is piped to the input of xargs.
The -I flag tells xargs to split on linefeed, rather than looking for whitespace. Lets have an example.
the ls -1 command will show you a directory listing on a single column, like this..
┌─[✓]─[cs@box3]─[/]
└─ls -1
Applications
Library
System
Users
Volumes
bin
cores
dev
etc
home
opt
private
sbin
tmp
usr
var
If we feed this output and pipe it to xargs, we can tell it by means of the -I flag to split on each line, and store the value in the ‘replace string’ symbol which is defined immediately after the -I flag. We can then use that ‘replace string’ value in a command. Xargs will take the first line of the directory listing, store it its value, and then call a command where we can use this value.
A simple example, using echo… we get the listing, process it and call echo to prefix each line before we read it back out again.
┌─[✓]─[cs@box3]─[/]
└─ls -1 | xargs -I % echo 'Directory name of %'
Directory name of Applications
Directory name of Library
Directory name of System
Directory name of Users
Directory name of Volumes
Directory name of bin
Directory name of cores
Directory name of dev
Directory name of etc
Directory name of home
Directory name of opt
Directory name of private
Directory name of sbin
Directory name of tmp
Directory name of usr
Directory name of var
We can now build a command to read all the security group id’s, split them into a series of individual ID’s and iterate over the list to see if that ID is in fact attached to a network interface….
Reading through the command, the first part before the pipe is our old aws command that generates a list of ID’s one per line. This is then fed to xargs, which is told to split on each new line, and place the first value in the ‘%’ string. It then calls the second aws command to query if there is a network interface which has that security group ID attached. Once the command finishes, xargs then pops off the next ID, and runs the command again, and repeats until the list is finished. The entire output is then redirected to a disk file for easier processing.
Unfortunately the output is not actually of any use…. Examination of the file shows that the output is dumped but because there is no record returned we cannot find out which security groups result in an empty response. The file section is shown below… (you will excuse my editing of internal naming structures for security reasons..)
You can see that in the first case, the information returned contains the GroupId of the security group, the second one simply returns a completely empty null value. "NetworkInterfaces": [] It clearly shows that a group exists with no attachments to a network interface – but which group ID was it?
The easiest solution is to modify the command called by xargs to echo the contents of the ‘%’ to the output before calling the aws describe-network-interfaces command. This is easily done by wrapping the two commands as a string, and getting xargs to invoke a shell to process it.
The command that xargs runs is now just sh for the comamnd shell, passing it a command string with the -c flag. It echos the contents of ‘%’ to stout, calls the aws describe-network-interfaces and then takes the stout and redirects to a text file. The results are below.
Yes, one of the offending groups was called ImatestSG34 – but there were about ten others with “normal” names out of about 800 in total. The output file provides a useful record and it’s easy to search it with a text editor for the "NetworkInterfaces": [] lines.
Unlike say Powershell, the AWS cli doesn’t have great support for pipelining. I hope though that this shows you with a little ingenuity you can build up powerful single line commands to solve problems in the CLI
In the last article we looked at how EC2 and SSH access worked. Whilst SSH keys offers greatly improved security over passwords and usernames, there are a few issues with it.
TOFU, is the first one, and I’m not talking about the slightly odd thing made from soyabeans. Trust on First Use means that the first time you connect, you have to trust that the computer you are connecting to is, well, the one you expect. This is also known as the MITM, the man in the middle problem – if someone can interpose themselves between you and the host you want to connect to, they can pretend to be that host, steal your login credentials, then they have you login, your identity, all your money the dog, and if you are really lucky they will also steal the in-laws as well…
Ahem. Seriously though, TOFU can be a real problem, or just a spectacular annoyance. One little quirk of EC2 though can really prove annoying.
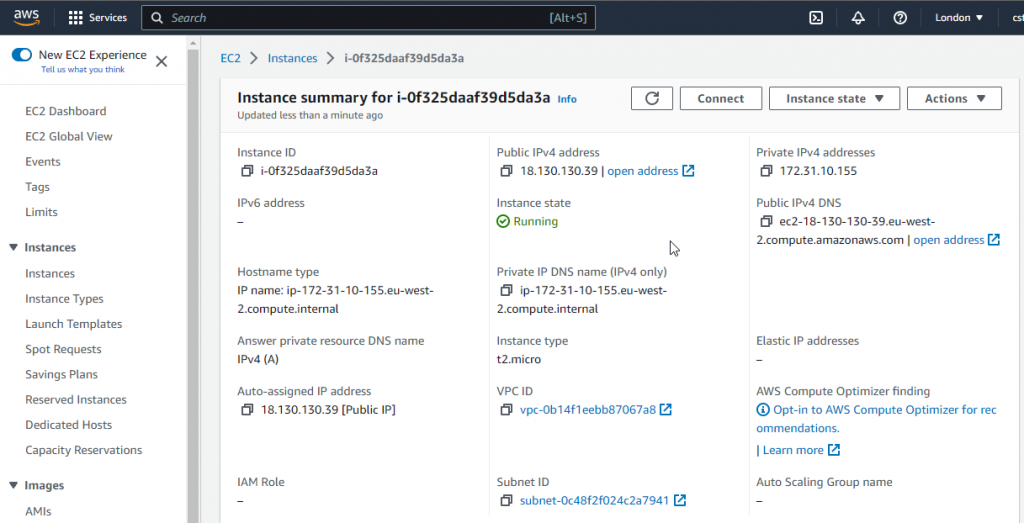
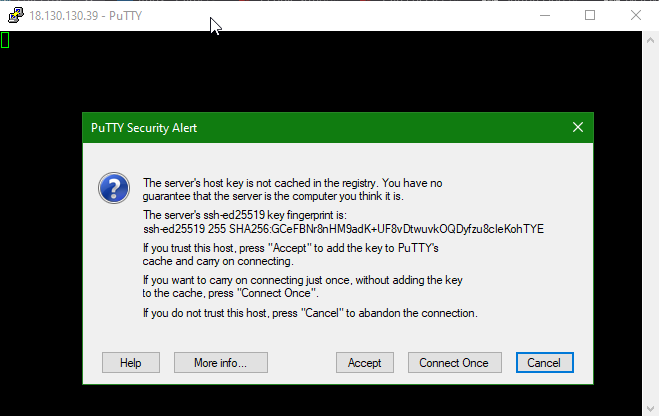
Here we have an EC2 instance, running one the AWS free tier (you have signed up for this yes? Go on, definitly worth it). You can see it has a public IP address of 18.130.130.39
Incidentally, if you are using the PuTTY tool from windows, and want to know how to connect there is a short note on how to do so.. https://www.thenetnerd.uk/2022/12/20/putty/
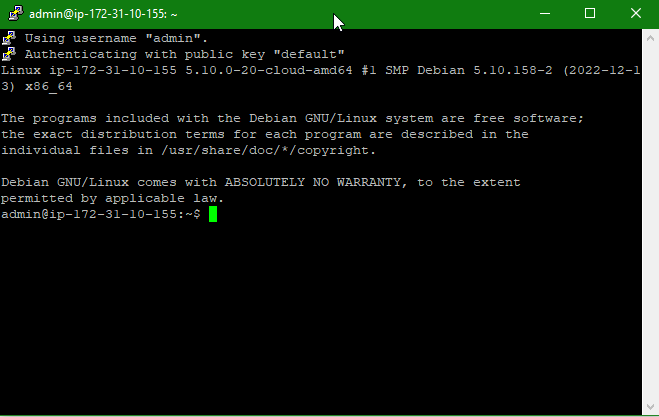
If you feed in the default key and connection name of admin (because it’s a Debain instance it doesn’t use the more familiar ec2-user) then you can SSH to it and get connected. The first time it will ask you if you want to connect to the host, and if you trust it…
Click Accept, and it will log you in. This is exactly how the SSH keys are expected to work.
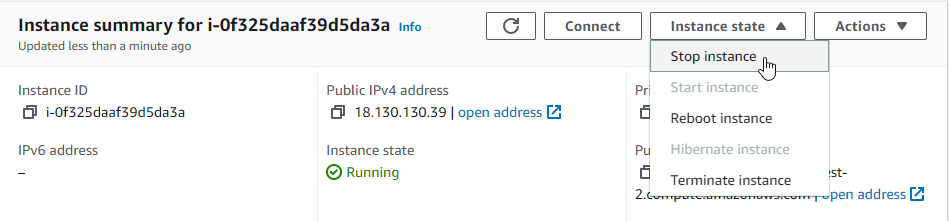
If you subsequently retry the connection, it will not ask you if you trust the host again. Trust is built in, everyone ahs the keys and all is well. That is, until you stop and restart the instance…
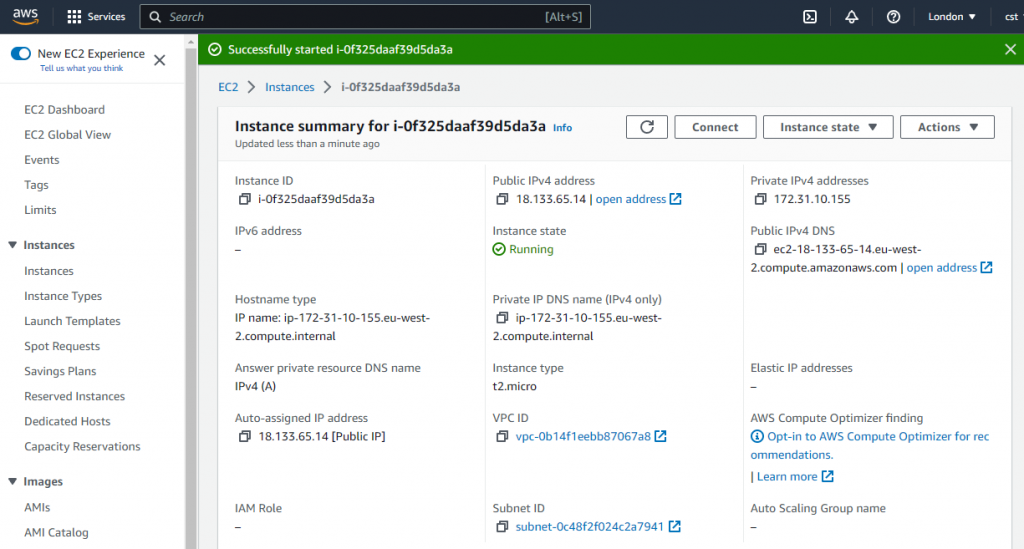
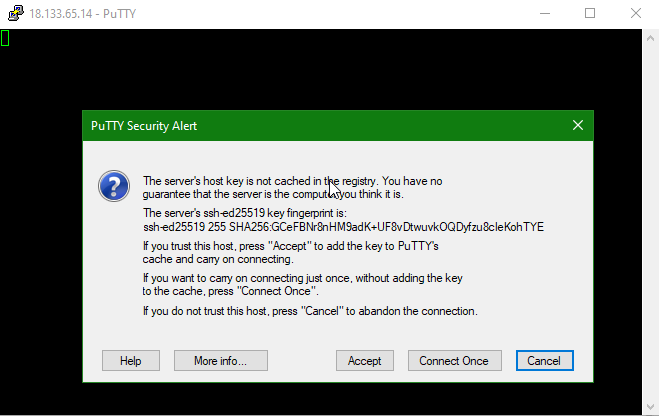
Once restarted, although the instance is the same it becomes clear that we have another Elastic IP address assigned.. 18.133.65.14
If we try to connect to this new address – even though its the same ED2 machine then perhaps inevitably…
The SSH connection throws a warning if either the hostname, or IP address changes. You can clearly see that the host is the same – the Key fingerprint is the same in both cases, but the change in IP is unexpected and hence the warning.
This is a problem that is an extention of the Trust on First Use issue. In the next post we shall look at how you can overcome this using an SSH certificate and a trusted Certificate Authority.