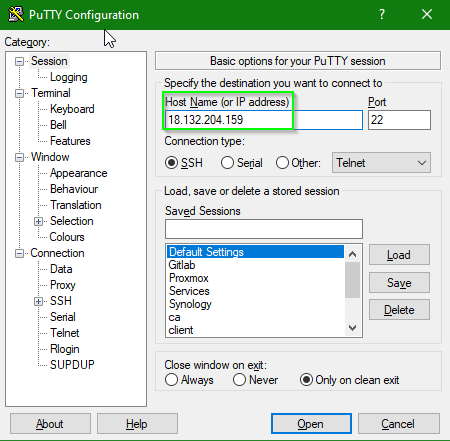
If you are wanting to connect from a Windows machine to an SSH client, on Linux, BSD, etc then probably there is nothing better than PuTTY for this. However, if you are using SSH keys, then it can be a little, abstract to start with.
You need a PPK format private key, and you have to tell PuTTY where to find this, and what connection name to use. First of course, is to enter the IP address or FQDN that you are connecting to…
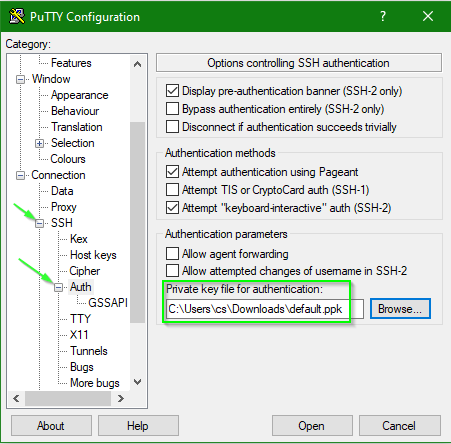
Next, you need to click on the left menu, go down SSH and then Auth to find where you can insert the private key for the connection.
Finally, you need to tell it what username you wish to connect to on the host – you will find this in the Connection, Data section, which is not at all obvious.
Once you have added these, click on Open to open the connection and you should connect in direct!
If you launch an EC2 instance, come on, weve all done it – launched the thing and not provided any keys for it and you cannot connect. I’ve heard this time and time again – why can’t we use a password?
AWS uses SSH keys, and if you have never used these before then there is a lot more to them than the first glance you will have seen with EC2 instances. Let’s take a look at them in a lab environment….
How Do SSH Keys Work?
SSH can authenticate clients using several different means. The most basic and familiar perhaps is username and password authentication. Although passwords are sent to the host over the network in a secure manner, it is possible to attack them by various means. Brute force attacks, shoulder surfing, and even keylogging devices, malware or cameras can all reveal passwords. Also, humans are really bad at picking passwords, and they can often be guessed. Despite there being sticking plasters for this, SSH keys prove to be a reliable and much more secure alternative.
An SSH keypair is made of two linked keys. There is a public key, which can be sent to anyone without security being comprimised, and a private key that must remain, as they name says, utterly private. The usual names for these keys are id_rsa and id_rsa.pub
The private key should remain on the client machine that will use it, and should never be moved anywhere else. If it does, anyone with access will also be able to access remote hosts as if they were the owner. As a precaution, the privatekey can be encrypted on disk with a passphrase.
The public key can be shared freely without consequence. The public key is used to encrypt messages, and due to the design, you cannot decrypt them with the public key. You are only able to decrypt them by using the private key. Consequently, this can be used as a way of proving that you possess the private key, if someone else has the public key. They send you a message encrypted with the public key – you decrypt with the private key and send it back to them.
For use with SSH, your public key is uploaded to a remote host you wish to connect to. The key is appended to a file that contains all the public keys that are allowed to connect to the server, known as the authorized keys file, which usually is found at ~/.ssh/authorized_keys.
When an SSH session takes place, the client connects to the remote host and presents the fingerprint of the public key. If the remote host has that public key it challenges the client to prove it has the private key by encrypting a message. If the client can decrypt the challenge, and prove it has the private key, then it is allowed to connect, an appropriate shell session is spawned, and the client connects.
Homelab
This is easy to investigate in a homelab if you are running something like Proxmox, VMware Workstation, or similar….
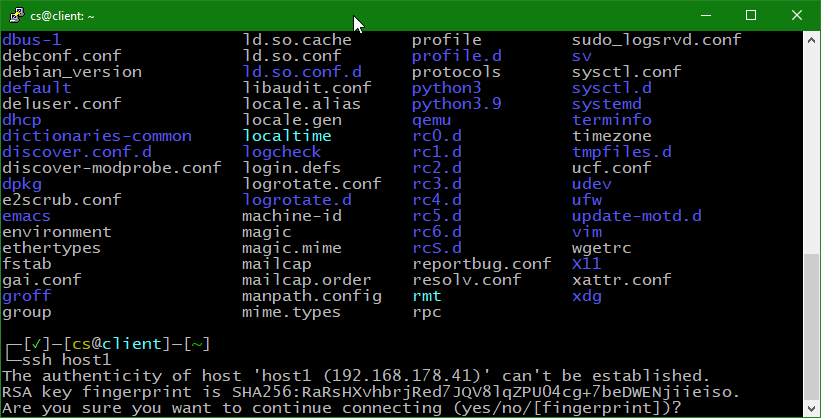
Here we have a few servers in my home lab. Host1, Host2, and client, all are running Debian 11. If we connect to the client machine and then try to SSH to another – say host1 we get a response about the authenticity of the host not being established…..
This is the Trust on first use or TOFU problem. You may have no idea if the server you are connecting to is actually the one you expect and so the system asks you if you are really sure that you want to connect to it. Type yes, and it says something about adding a key, and then it lets you login…
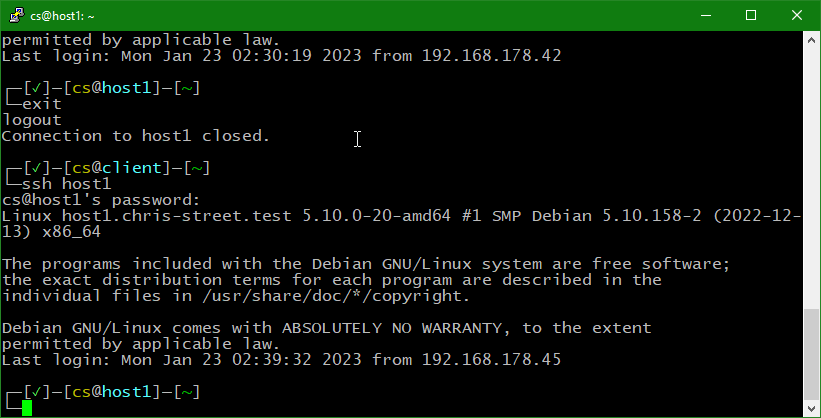
If you subsequently try again then it connects straight away – without the message as can be seen here. I disconnect from the far end server and then reconnect and it goes in without the message.
Let us have a look at just what SSH is doing here….
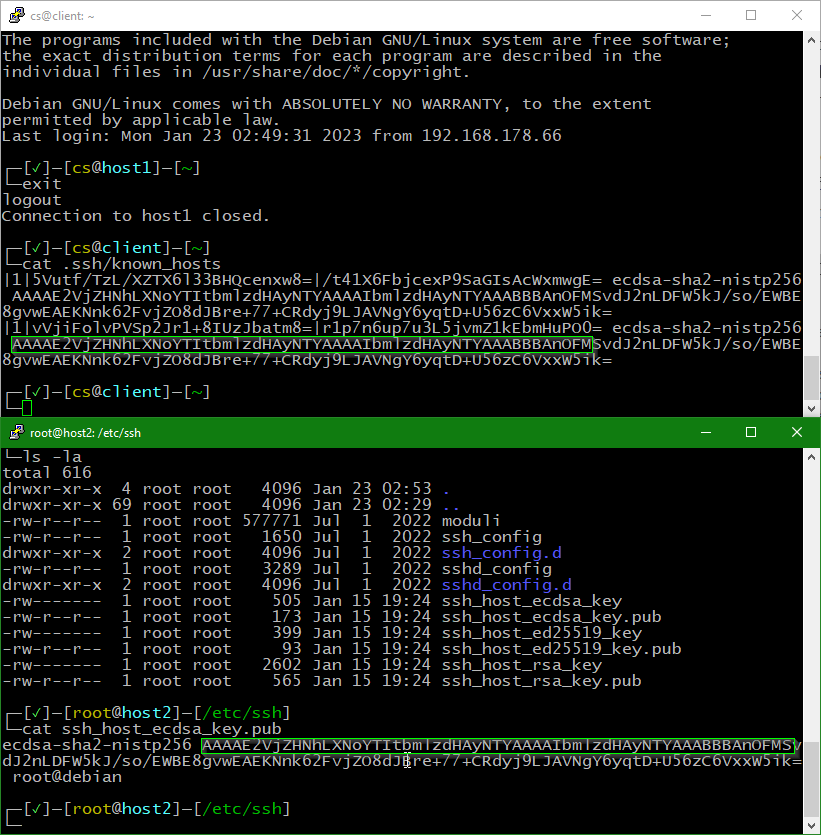
On the client machine, there is a hidden folder in the users home directory called .ssh Inside this, there may well be a number of files, but the one we are interested in is called known_hosts
The known_hosts file contains a list of the host keys that it uses to identify hosts that it has sucessfully connected to. If you look in the /etc/ssh folder on a server you will see a number of files.
The ssh_host_ecdsa_key.pub is presented from the server to the client during the initial signon. Once successfully signed on you can see the key appear on the client known_hosts file. Looking at the example screens below you can clearly see the key appearing in the clients known_hosts file – a matching section has been highlighted.
The key comes as two parts – there is a public and private part. When log on the server sends the public part of it’s key and asks you to trust it. Assuming you do, then when you next connect you can use the public part of the key to send an encrypted challenge, that only the server with the private part can reply to. Hence trust is assured.
EC2 keys
When you log on to an AWS EC2 instance, you don’t use a username and password. Instead, you supply a keypair. This keypair acts as a logon credential, being something that you – and hopefully you alone possess. So how does it work.
Lets look at the lab environment again.
Host1 is set up to permit password based authentication – the default in SSH is to permit this and unless specifically set otherwise it will always allow a username and password to be supplied.
cat sshd_config
...
# To disable tunneled clear text passwords, change to no here!
#PasswordAuthentication yes
...
If you set this to PasswordAuthentication no then you cannot login with a password – it will simply refuse and if you have no other way of getting in, then you are stuck! If you want to try this, open TWO sessions to the host and make the change and then reconnect one of them. The other session will remain open so you can revert the change. Remember that you need to restart the sshd service after making the change with a systemctl restart sshd command.
The result is clear… on host1 we turn off password authentication
┌─[✓]─[root@host1]─[/etc/ssh]
└─cat sshd_config | grep PasswordAuthentication
PasswordAuthentication no
Connections from the client machine are now refused.
In order to logon, we need some way other than a username and password now. I’ll show you know how you can do this with SSH keys.
To generate a public key pair we use ssh-keygen. This will create a public and a private keypair. If you allow it to use the defaults it will work, but we want to tweak them a little. By setting a couple of options, we generate RSA keys, and we have a keysize of 4096 bytes, or 4k.
This will give us a good old fashioned, but perfectly secure pair of keys that should work on just about anything. They will if created appear in the hidden .ssh directory in the home folder.
┌─[✗]─[cs@client]─[~]
└─ssh-keygen -t rsa -b 4096
Generating public/private rsa key pair.
Enter file in which to save the key (/home/cs/.ssh/id_rsa):
Enter passphrase (empty for no passphrase):
Enter same passphrase again:
Your identification has been saved in /home/cs/.ssh/id_rsa
Your public key has been saved in /home/cs/.ssh/id_rsa.pub
The key fingerprint is:
SHA256:a7Wukl39ArAdZlwPAMexB1IB6mG5/zgulRcnp1YLqJQ cs@client.chris-street.test
The key's randomart image is:
+---[RSA 4096]----+
|        +=B+     |
|       o o.oo    |
|      =. o...o   |
|     oEoo O.+ .  |
|     .o.SB.@ .   |
|      ..+oB.o    |
|       +++.. .   |
|      +.o+  . .  |
|       ++oo  .   |
+----[SHA256]-----+

┌─[✓]─[cs@client]─[~]
└─ls .ssh
id_rsa  id_rsa.pub  known_hosts

┌─[✓]─[cs@client]─[~]
└─
We now have the means of identifying ourselves to another server by something other than a password. We can have the remote host that we are connecting to send us a challenge, which we can prove with the private half of the keypair. This is something that only we (in theory!) know, so the host knows it is us.
For this to work though – we have to have the public part of the key on the remote server. So that needs to be copied over there, like this. If you haven’t yet set the host back to accepting password logins, then you need to do this first.
Most SSH based systems provide the ssh-copy-id tool which will be used to copy the key over to the host. It does require that you have a valid username and password. However below I will show the process manually so you can more easily see what is going on, with an example of ssh-copy-id given at the end.
SecureCoPy the public key from the client to the host using the SCP command.
Logon to the host with username/password combo.
Verify that the id_rsa.pub file has arrived
Check and if necessary create the hidden ~/.ssl directory
Make sure that the permissions for ~/.ssl are set to 700 or it will not work
The contents of the public key file are then listed and appended with the double redirects to the end of the authorized_keys file. If you use a single redirect, then it will overwrite the existing list of keys! This is why this method is not recommended as it is too easy to break something catastrophically.
Once the key has been appended, ensure that the authorized_keys file has a permission of 600 – again if this is incorrect then it will not work.
Once the clients public key is on the host then it can use this to be sure that the client is authorised to connect – because it can verify that the public key is present in it’s authorized_key files. The host can then send an encrypted challenge to the client and get a response back – proving that the client does have the private half of the key.
If once set up correctly you try to connect, SSH will use your local id_rsa keypair automatically, and you will find that it will just connect without requesting any further information.
Well done. You now have ssh key based authentication to allow you to connect.
To set this up with no risk of breaking things ssh-copy-id should be used. It is a simple one line command and it will automatically pick the key for you, and send it to far end if you provide username and password.
┌─[✓]─[cs@client]─[~]
└─ssh-copy-id cs@host1
/usr/bin/ssh-copy-id: INFO: Source of key(s) to be installed: "/home/cs/.ssh/id_rsa.pub"
/usr/bin/ssh-copy-id: INFO: attempting to log in with the new key(s), to filter out any that are already installed
/usr/bin/ssh-copy-id: INFO: 1 key(s) remain to be installed -- if you are prompted now it is to install the new keys
cs@host1's password:
Number of key(s) added: 1
Now try logging into the machine, with: "ssh 'cs@host1'"
and check to make sure that only the key(s) you wanted were added.
┌─[✓]─[cs@client]─[~]
└─ssh cs@host1
Linux host1.chris-street.test 5.10.0-20-amd64 #1 SMP Debian 5.10.158-2 (2022-12-13) x86_64

┌─[✓]─[cs@host1]─[~]
└─
It carries out the same manual process as above, but far more effectively.
This is the same process that AWS EC2 uses – we have simply replicated what the process is. In the next post I will look at the common problems that are found with this, and the varying ways that these can be overcome.
Let’s face it, if you are going to spend a deal of time at the command prompt, you want to to look good right? After all we have colour terminals now and everything.
The standard Debian command prompt is coloured (unless you are root) and whilst it looks OK, it is a bit… well… boring. I also don’t like the way it gets subsumed in the mass of text, and can be sometimes difficult to look back to the previous commands output.
If you’ve never really played with prompt before, it is configured in the shell variable (which is different to environment variable) that is called PS1. You can easily see what it is set to by just displaying the variable.
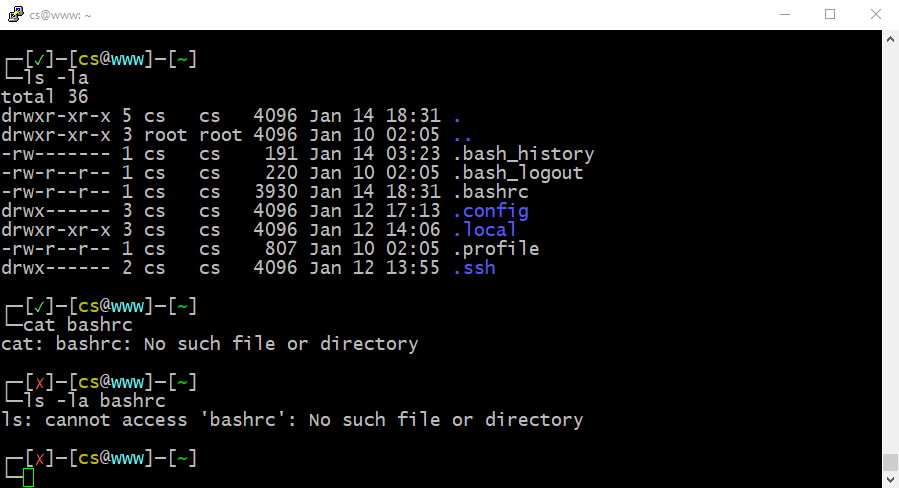
The original setting for the prompt is stored in a hidden bash configuration file that will be in your home directory, known as .bashrc – to see hidden files use the ls -la command and modifiers to list them To get the prompt back you can just source the file again which will replay it and restore the prompt.
Prompt->ls -la
total 36
drwxr-xr-x 5 cs   cs   4096 Jan 12 17:13 .
drwxr-xr-x 3 root root 4096 Jan 10 02:05 ..
-rw------- 1 cs   cs    191 Jan 14 03:23 .bash_history
-rw-r--r-- 1 cs   cs    220 Jan 10 02:05 .bash_logout
-rw-r--r-- 1 cs   cs   3930 Jan 12 14:07 .bashrc
drwx------ 3 cs   cs   4096 Jan 12 17:13 .config
drwxr-xr-x 3 cs   cs   4096 Jan 12 14:06 .local
-rw-r--r-- 1 cs   cs    807 Jan 10 02:05 .profile
drwx------ 2 cs   cs   4096 Jan 12 13:55 .ssh
Prompt->source ./bashrc
cs@www:~$
It’s also possible to add dynamic information like the current user, date and time, and your current directory into the prompt… by adding escape characters you can instruct the prompt to build a custom string for you… for example the \u sequence adds the username and the \t adds the time…
More complex escape sequences allow for colours to be changed, and special characters… These are easily seen in a prompt with the \e construct, followed by a number. A comprehensive list of them can be found here.
Using escape sequences, you can build up colour changes, and special characters and split the prompt across multiple lines. The prompt that I have set on my of my servers also has a little bit of code in that queries the return code from the last command by means of an if statement, and then sets a character to show you if the last prompt succeeded or failed. It also shows the hostname and username, and the current directory on the prompt. The host and username is especially useful when working on multiple systems at the same time.
You can see that when I miss the leading period from the .bashrc file the shell errors, and the return code shows a cross. Successful commands with a return code of zero cause the green tick to be displayed.
The code to do this is not that long, but it is more than a line. You should try setting the command prompt with this all entered on one line with some judicious cut and pasting…
Remember if it goes horribly wrong, the way back is just to enter source .bashrc assuming you are in your home directory.
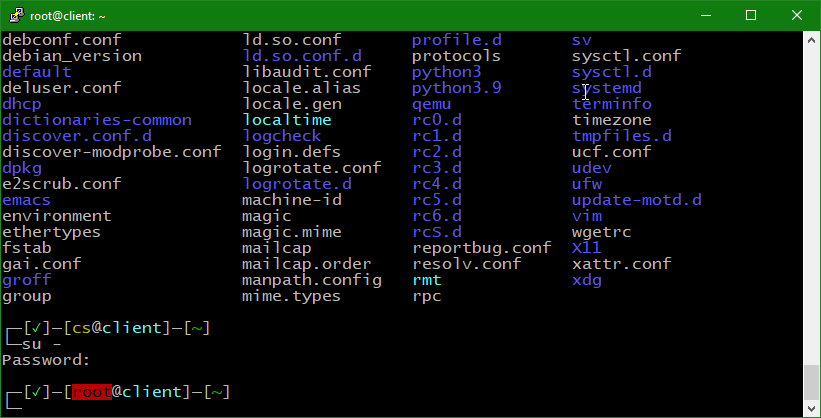
Now, getting more fancy, how about a nice bold colour for the user, to remind you if you are running as root…? All you need to is add in another IF statement to check. The general format of this goes like this…
You start the code block with a $ so it is actually executed as code, and wrap the whole thing in brackets.
The colour sequences are escaped with a \033 then the colour sequence, so if we test $USER to see if it is root, we can then write out the opening [ which appears on screen, followed by the \033[0;30m for a dark grey text, and follow up with \033[41m to turn the background bright red. After we print up the username with the \u we can then revert back to regular colours with the sequence \033[0;37m\033[40m If the user is not root, we print the original sequence instead to display a yellow on black username.
It gives a useful warning that you are logged in as root, and therefore need be careful….
The above prompt has been knocking around in my notes for many years, although the idea is not mine. I found it as part of a somewhat esoteric and long gone linux distribution many years ago and tweaked the output a little to suit my tastes more. If anyone can remind me where this did come from, please let me know.
There is no doubt about it – to get good at IT, coding, etc you need hands on practice. But how to do it – without actually having a lot of kit?
The solution is to emulate it. Modern processors, almost all of them in the last ten years or so can support virtualisation technologies. This lets you run a lot of virtual machines, with their own network cards, disks, CDroms, etc inside one machine…
This for instance, is my laptop. It’s running a copy of VMware Workstation Pro, and you can see there are a number of virtual machines that have been created.
There are images of some Windows 2016 and 2019 test servers, an old copy of windows 95, just to remind you what computing was like 30 years ago, and a running copy of Linux Mint Debian Edition. Incidentally, if you dont like the way Debain looks, try LMDE instead. Very slick indeed….
Workstation will happily run dozens of machines at once on a laptop if you have enough ram – mine has 64GB ram and I can easily persuade 25 machines with a couple of GB of ram each to start up. Modern kit is really quite overpowered for some things, but it comes in useful for this.
The only snag with Workstation is that it’s not free and demands money… If you just want to try it out then an excellent, totally free alternative is something called VirtualBox, https://www.virtualbox.org/ If you want to build a homelab, this is the place to start.
As well as programs that run on a copy of Windows or Linux, you can also get ones that replace your operating system entirely. If you have a spare PC lying around with a fair bit of RAM and disc then something called ProxMox https://www.proxmox.com/en/is another alternative, although this will require a lot more work up front. If there is enough interest, I will probably put up an article about setting up your own ProxMox home environment.
Is it because it’s new, and sexy, and shiny, and the in thing? Or just because thats where all the money is? All of which are true, but….
If you are wanting to do cloud computing, just remember this, with apologies to all the cloud providers out there….
Cloud computing, is just computing on someone elses computers…
Really, thats all it is. I mean there is a lotmore to it than just someone elses computers – you won’t ever be able to play with a database that scales like Aurora does unless you drop a few million pounds, you won’t have access to the petabyte scale of storage unless you spend a few million more, and scaling up and down a few thousand machines in minutes is, well, amazing… But at the end of the day – it’s just someone elses computers.
So get good at using your own computers first. What I mean is – DON’T try and dive into cloud computing as your first job. It’ll come unstuck. Get a good sensible entry IT position like I said – and as soon as you do and you start learning with that wonderful on the job experience, then – start thinking like the cloud.
I’m not even going to explain to you what cloud computing is – because the people at Amazon have done a way better job than me. They have oodles of training courses in almost every language you would want – and best of all the intro courses are entirely free.
Oh, and if you want to try cloud computing as well – they give you a free AWS account for 12 months. Cannot really beat that. And yes, it is a little bit limited, the AWS free tier still gives you all you need to do some serious exploration of what cloud is all about.
I get asked this question a lot. And the simple answer is – I’m probably not best placed to tell you.
See the thing is, when I started old greybeard that I am it was a gentler, easier world. The Pentium had just launched, the Pentium Pro was not even out, and computers, whilst not a curiosity were by no means essential to the workplace. As for the Internet – that was still something for academia, and Amazon was still a twinkle in Jeff B’s eyes..
In that sort of environment, anyone could hold enough knowledge of the entire IT landscape and business processes in their head to be able to walk in, and *be* the IT resource for an entire company. I know I did, and the thing was any well presented nerd could easily convince people that they did know everything, and get it all set up. The late 1990’s IT boom was really an explosion of the early 1980’s home computing phenomena, as those people who started with BBC micros and Spectrums etc, came of age and took off in the workplace…
So what do you need today?
There is a difference between what you need to do – and what you need to be. If you want to succeed in IT, then perhaps more than any other field of endeavour you need to always, always, always be learning. Continuous professional development is the norm, and you need to be doing it all the time. This takes passion and curiosity for the field for without that passion you are never going to be keeping ahead of new technology and identifying what you need to learn, and master next.
Gene Kranz was the Flight Director at NASA for the Apollo 11 landing, and the Apollo 13 accident, but it is the lesser know Apollo 1 disaster that gave rise to the Kranz dictum…
Be tough and competent
Kranz was referring to the Apollo 1 disaster where Grissom, White, and Chaffee died in a capsule fire, which was entirely due to people not being willing to stop things before they became catastrophically out of control.
Tough means we are forever accountable for what we do or what we fail to do. We will never again compromise our responsibilities. Every time we walk into Mission Control we will know what we stand for.
While you might not be directing a lunar mission, working in IT means that you are likley to be in a position to have an immense impact on peoples lives. Working in banking? Be careful not to wipe out everyones access to their accounts for a month or more.. Doing a spot of healthcare related work? Just be careful not to leak a few million highly sensitive records out for people to be blackmailed with.
If you want to work in IT, expect that you need to be tough and accountable – for everything that you do. You will make mistakes – are you prepared to own and correct those mistakes?
Competent means we will never take anything for granted. We will never be found short in our knowledge and in our skills.
As for competence, you will find that everything moves all the time. That version of PHP you mastered? Yup version 8.0 just dropped. You think you can program in Python well? Just have a look at version 3 – oh and we changed the coding so please refactor all your print statements because they are now functions… Its continuous none stop learning, all the time, without end, and if you cannot – you will get dropped by the wayside.
So what do you need to do to get into the modern IT world then?
Get one of the free linux operating systems, and start using it.
If you are not already using and running and tweaking linux – then start. I personally use Debian, but you will probably be better off using a more commercial facing distributions like SuSE or RedHat. A lot of people will say to use Ubuntu, but I’m rapidly going off of the direction that Canonical is taking the distro and I’ve now reverted to a straight Debian install on my laptop.
Have a genuine interest in technology
If you are going to work in this field – you need to be interested in this field unless you are happy to sit in something like a helpdesk, or frontline support. You need to show this, or people will wonder just how well you will stay current. So read the relevant press. Read Wired to find out trends of the industry. If there are industry exhibitions nearby – go to them. Online magazines, make sure you take time to read them. A Flipboard account https://flipboard.com/ will make this a lot easier if you set one up.
Get certified.
Either industry certifications, or something like a Level 3 BTEC is a place to start. You can get them done inside of a few weeks to a few months, they are something concrete and they are fairly well recognised. You are almost certainly going to be coming in at the bottom, and at this level no one expects much experience, but a solid certification in something will help get the foot in the door.
Once in – I’ll let you into a secret. No one really cares that much – when you are in the door, it’s all about experience. Theres very little to be had in doing more general certifications but there is still a lot of value in doing specialist niche qualifications for specific software and hardware tooling.
Learn to code
This has to be the other essential skill. You need some ability to code, regardless of what you are planning to do. Even Windows is moving towards code being a required part and Powershell is quite a powerful and robust language these days. It doesnt really matter what you language you learn, as long as you do learn one because if you can code, then it’s easy to transfer to some other language.
Python is probably the easiest and best language to start on, it’s also quite popular at the moment, tying for top place with Java. I would NOT recommend starting with Java, it is a rather abstract place to start in and will lead to frustrations. It would also serve well if you learnt the basics of Bash scripting if you are planning on tinkering with any form of Linux, or Powershell if you are playing with Windows.
Udemy has plenty of courses and if you look for the regular sales you can get them at silly prices. Pick a presenter whose voice you can get on with, and start learning. I’d recommend Dr Angela Yu as a good one to try first..
Once you have done the above – and whilst you are doing it of course – you need to do the usual. Network, apply for jobs, talk to recruitment agents. If you don’t have a linkedin profile get one set up. Sign on to jobserve and the best of luck…